


Crafting Your Sanctuary: The Ultimate Guide to Gallery Wall Ideas for Living Room Magic
Creating a gallery wall might seem a little daunting at first – a blank canvas staring back, perhaps a pile of beloved prints and photos awaiting their moment in the spotlight. But I promise you, with a little planning, a sprinkle of creativity, and these practical gallery wall ideas for living room spaces, you’ll be able to design a display that doesn’t just fill a wall, but fills your heart. We’ll explore everything from choosing your art and arranging your layout to the perfect hanging techniques and how to ensure your gallery wall truly integrates with your living room’s existing charm. So, brew your favorite tea, settle in, and let’s turn that design dream into a beautiful reality!
The Art of the Start: Planning Your Gallery Wall Layout
Before you even think about hammering the first nail, a little thoughtful planning goes a long way. Think of this as your gentle preliminary sketch, the quiet contemplation before the vibrant brushstrokes begin. The foundation of a stunning gallery wall lies in its layout, ensuring a cohesive and pleasing visual flow.
Map It Out: The Paper Template Method
This is perhaps the most crucial step and one I absolutely swear by! Instead of guessing and creating unnecessary holes, make paper templates of all your frames and objects. Simply trace each frame onto kraft paper or newspaper, cut them out, and label them. This allows you to experiment with your arrangement directly on the wall without commitment.
- Gather Your Elements: Collect all the frames, mirrors, small shelves, or objects you plan to include. Don’t worry if they don’t match – we’ll get to that!
- Cut & Label: Trace and cut out paper templates. Don’t forget to mark where the hanger is on the back of each frame – this is vital for accurate placement.
- Play & Arrange: Use painter’s tape to stick your paper templates to the wall. Step back, observe, and rearrange. Try different configurations. Do you prefer a symmetrical grid or a more organic, eclectic feel? Experiment with a central anchor piece and radiating smaller items.
- Consider the “Eye Line”: A good rule of thumb is to place the center of your gallery wall at eye level (around 57-60 inches from the floor). This ensures comfortable viewing. If it’s above a sofa or console, leave about 6-10 inches between the furniture and the bottom of your lowest frame.
- Spacing is Key: Aim for consistent spacing between your frames, typically 2-4 inches. This creates a sense of unity. Too close, and it feels cramped; too far, and it looks disjointed.
Don’t be afraid to leave your templates up for a day or two. Live with them, walk past them, and allow the arrangement to “settle” in your mind before making it permanent. This is your personal design moment, so enjoy the process of discovery!
Curating Your Collection: Choosing Art & Objects for a Story-Filled Living Room
Mix It Up: Variety is the Spice of Life (and Design!)
The most captivating gallery walls often feature a delightful mix of mediums and textures. This adds depth and intrigue, preventing your display from feeling flat or monotonous.
- Photographs: Personal memories are a must! Family snapshots, travel photos, black and white portraits – these are the heart of your home. Consider printing some in sepia or black and white for a cohesive, timeless feel.
- Art Prints & Illustrations: Support independent artists, find digital downloads from Etsy, or invest in pieces that speak to your soul. Botanical prints, abstract watercolors, whimsical illustrations – the possibilities are endless.
- Textural Elements: Don’t overlook the power of textiles. A small woven wall hanging, a pressed flower art piece, or even a framed piece of delicate lace can add warmth and tactile interest.
- Mirrors: A mirror or two not only adds sparkle and reflects light, making your living room feel larger and brighter, but also breaks up the linearity of framed art. Look for vintage or ornate mirrors for added character.
- Small Shelves & Objects: Incorporate tiny floating shelves to display cherished trinkets, a small dried floral arrangement in an amber vase, a vintage teacup, or a unique figurine. These 3D elements add wonderful dimension.
- Heirlooms & Mementos: That embroidered hoop your grandmother made, a handwritten recipe framed, a pressed leaf from a significant trip – these deeply personal items are what truly make your gallery wall unique to your home.
When selecting your pieces, trust your intuition. Choose things that bring you joy, evoke a memory, or simply make you smile. The most beautiful homes are those that tell a story, and your gallery wall is a prime opportunity to share yours.
Finding Your Aesthetic: Styles & Themes for Living Room Gallery Walls
Every home has a unique voice, and your gallery wall should sing in harmony with it. Whether your living room leans towards cozy hygge, minimalist chic, or bohemian whimsy, there’s a gallery wall style that will perfectly complement your existing decor. Let’s explore a few popular approaches.
1. The Eclectic & Bohemian Rhapsody
This is perhaps the most forgiving and free-spirited style, perfect for those who love a collected, organic feel. Think mismatched frames, a riot of colors and textures, and a mix of personal photos with global art. This style often features:
- Mixed Frame Finishes: Gold, natural wood, white, black – all living harmoniously.
- Diverse Art: Travel photography, abstract art, botanical prints, woven wall hangings, small mirrors, and even a vintage plate.
- Organic Layout: Less rigid, often asymmetrical, expanding outwards in a pleasing, unconstrained manner.
- Warm Tones: Earthy hues, terracotta, amber, deep greens, and sun-faded pastels.
Rock Salt & Plum Tip: For an eclectic gallery wall, start with a few anchor pieces you adore, then build around them organically. Don’t be afraid to let your personality shine through every quirky choice!
2. The Modern & Minimalist Grid
If your living room embraces clean lines, thoughtful simplicity, and a serene palette, a minimalist gallery wall might be your ideal. This style often uses uniform frames and a precise layout for a sophisticated, understated impact.
- Matching Frames: All frames in the same color (black, white, natural wood) and often the same size, or a limited selection of sizes.
- Symmetrical Layout: A perfect grid, horizontal line, or vertical column for a crisp, organized look.
- Limited Color Palette: Black and white photography, line art, subtle abstract prints, or a series of monochromatic landscapes.
- Ample Negative Space: Allowing plenty of wall space around and within the gallery for a breathable, uncluttered feel.
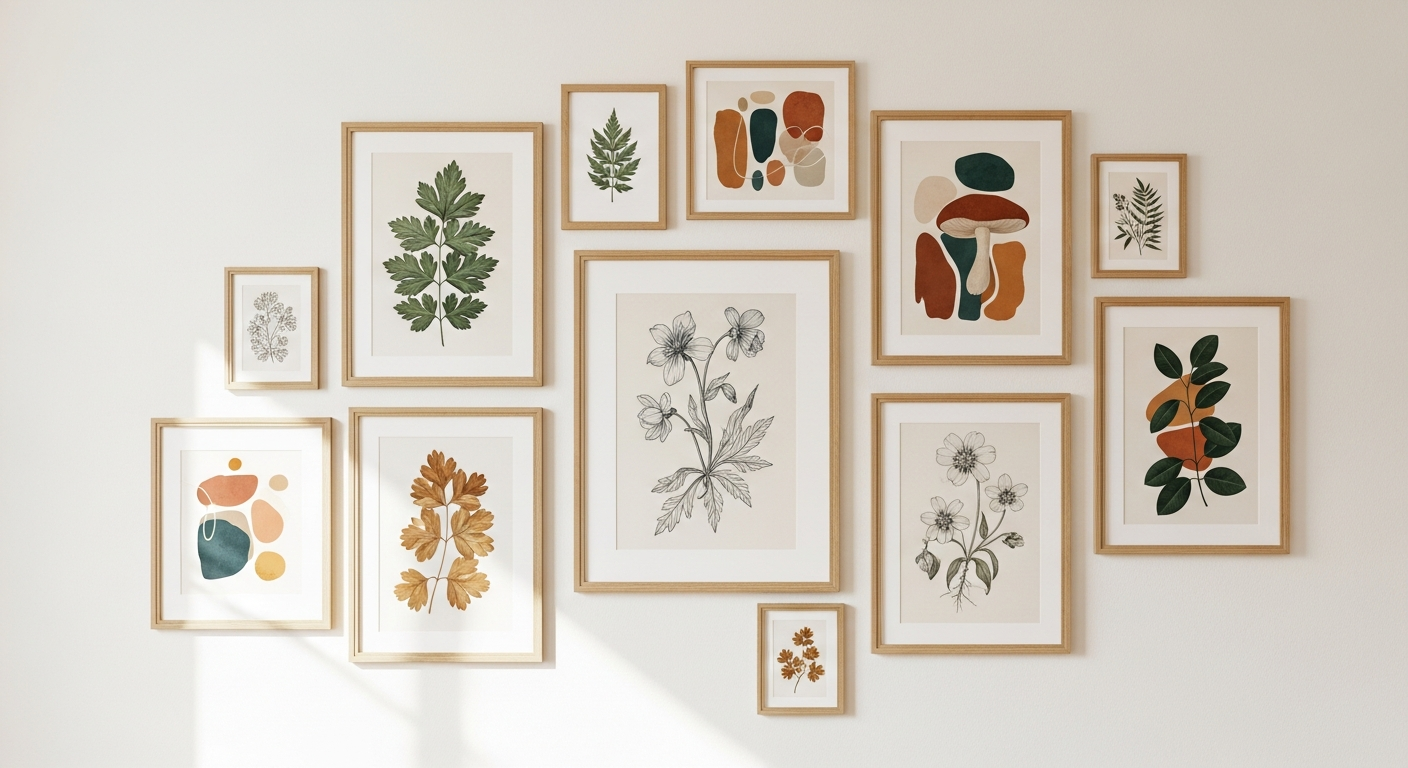
3. The Vintage Charm & Heirloom Haven
For lovers of history, nostalgia, and a touch of old-world elegance, a vintage-inspired gallery wall is a beautiful choice. This works wonderfully in a living room with antique furniture, rich textures, and a cozy, lived-in atmosphere.
- Ornate Frames: Gilt, distressed wood, or intricately carved frames, often found at antique markets or thrift stores.
- Historical & Personal Content: Old family photos (black & white or sepia), botanical illustrations, antique maps, pressed botanicals, delicate embroidery.
- Warm, Muted Colors: A palette of creams, faded greens, soft browns, and dusky blues.
- Thoughtful Juxtaposition: Mix larger, ornate frames with smaller, simpler ones for visual interest.
No matter your style, the key is consistency in your chosen aesthetic, even if you’re mixing and matching. A common thread – be it frame color, subject matter, or overall mood – will tie everything together.
Hanging Your Masterpiece: Practical Tips for a Flawless Finish
You’ve planned, you’ve curated, and now it’s time for the grand reveal! Hanging a gallery wall can feel like the trickiest part, but with the right tools and a bit of patience, you’ll achieve a professional-looking display that brings immense satisfaction.
Essential Tools for a Smooth Installation
- Level: Your absolute best friend for straight lines. Don’t skip this!
- Measuring Tape: For precise spacing.
- Hammer & Nails/Picture Hanging Hooks: Use appropriate hardware for the weight of your frames. Picture hanging hooks offer more support and less damage than just nails.
- Painter’s Tape: For your paper templates.
- Pencil: To mark your spots.
- Command Strips (Optional): Excellent for lighter frames or rental properties where you want to avoid nail holes. They also allow for easy adjustments.
- Wall Anchors (for heavy items): If you have very heavy frames or mirrors, ensure you’re using appropriate wall anchors to secure them properly.
Step-by-Step Hanging Guide
- Finalize Your Layout with Templates: Double-check your paper template arrangement. Take a photo with your phone for reference!
- Mark the Hanging Point: For each paper template, carefully mark the spot where the nail/hook will go (remember that mark you made for the hanger on the back of the frame?).
- Remove Templates: Carefully peel off the painter’s tape and remove all your paper templates. You should now have pencil marks on your wall indicating exactly where each hanger needs to go.
- Measure & Double-Check: Before hammering, take a moment to use your measuring tape and level to confirm your marks are where they should be. Measure the distance between marks to ensure consistent spacing.
- Hammer Time: Carefully tap in your nails or picture hanging hooks at each marked spot.
- Hang Your Frames: Starting with your central anchor piece (if you have one), begin hanging your frames. Use your level again for each piece as you hang it, making tiny adjustments as needed.
- Step Back & Admire: Once all pieces are hung, step back and take it all in. Marvel at your beautiful new living room focal point!
If you’re using Command Strips, follow their instructions carefully regarding weight limits and application. They are fantastic for lighter frames and offer great flexibility for future rearrangements.
Beyond the Wall: Integrating Your Gallery into Your Living Room Decor
A gallery wall isn’t an island; it’s an integral part of your living room’s overall story. The most successful displays feel cohesive with the surrounding furniture, textiles, and lighting, enhancing the room’s warmth and personality. Here’s how to ensure your new masterpiece feels right at home.
Harmony with Furniture & Layout
- Anchor Above Furniture: Most gallery walls are positioned above a key piece of furniture, like a sofa, console table, or a sideboard. Ensure there’s a comfortable gap (6-10 inches) between the top of the furniture and the bottom of your lowest frame. This creates visual weight and grounds the display.
- Balance & Proportion: Consider the size of your wall and the furniture below it. A very small gallery wall above a huge sofa might look lost, while an oversized one on a tiny wall could feel overwhelming. Aim for balance – your gallery wall should generally be about two-thirds the width of the furniture it sits above.
- Room Flow: Think about how you move through the room. Does the gallery wall feel inviting or like an obstacle? It should enhance the flow, not disrupt it.
Color, Texture & Lighting Integration
- Pulling Colors: Take inspiration from your living room’s existing color palette. You don’t need everything to match perfectly, but incorporating a few key colors from your throw pillows, rug, or curtains into some of your art prints will create a sense of harmony. For instance, if you have a beautiful amber throw, incorporate a print with hints of orange or warm gold.
- Echoing Textures: If your living room features linen upholstery or a plush wool rug, consider adding a framed textile piece or a small macrame hanging to your gallery wall. This textural echo creates depth and richness.
- Lighting it Up: Don’t let your beautiful gallery wall fade into the shadows after dusk! Consider adding a picture light above your display, or position a floor lamp nearby to cast a soft glow. This highlights your art and creates a lovely ambiance, perfect for cozy evenings.
- Nearby Styling: The area directly below your gallery wall offers another opportunity for integration. Style your console table or shelf with objects that complement the gallery – perhaps a vase of dried flowers, a stack of art books, or a beautifully scented candle.
By thoughtfully connecting your gallery wall to the rest of your living room’s decor, you’ll create a space that feels utterly cohesive, layered, and deeply personal. It’s all about making every element feel like it belongs, creating a warm and welcoming atmosphere.
Infusing Personality: Making Your Gallery Wall Truly Yours
The beauty of a gallery wall is its ability to be an ever-evolving reflection of who you are, what you love, and where you’ve been. This isn’t just about filling a blank space; it’s about telling your unique story, right there on your living room wall.
Your Story, Your Style
- Personal Mementos: Don’t shy away from incorporating things that hold deep personal meaning. A concert ticket stub from a memorable night, a pressed flower from a special bouquet, a child’s early drawing – framed beautifully, these become priceless pieces of art.
- Travel Souvenirs: Did you find a charming little print in a Parisian flea market? Or a unique postcard from a seaside adventure? Frame these treasures! They’ll remind you of cherished memories and add a global, well-traveled feel to your space.
- Hobbies & Passions: If you’re a nature lover, include botanical prints or framed specimens. If you adore vintage fashion, perhaps a framed sketch or a reproduction of an iconic costume. Let your passions spill onto your walls.
- Handwritten Notes: Frame a favorite quote in beautiful calligraphy, a meaningful passage from a letter, or a snippet of poetry. These personal touches add warmth and character that mass-produced art simply can’t replicate.
Evolving with You
A gallery wall isn’t meant to be static. As your life unfolds, your tastes evolve, and new memories are made, your gallery wall can change and grow with you. Think of it as a living, breathing part of your home.
- Seasonal Swaps: Introduce a festive print during the holidays, or a vibrant floral print in spring. These small changes can refresh the entire living room’s mood.
- New Memories: When a new family photo is taken, or you acquire a piece of art that truly speaks to you, don’t hesitate to integrate it. Swap out an older piece, or expand your gallery to accommodate new additions.
- Rearrange & Refresh: Sometimes, simply rearranging the existing pieces in your gallery can give it a whole new lease on life. Play with the layout again – move larger pieces, group smaller ones differently.
Your living room gallery wall is a testament to your journey, your aesthetic, and the beautiful life you’re creating. It’s a gentle reminder to slow down, appreciate the moments, and surround yourself with things that bring you immense joy and comfort. Let it be a reflection of your soul, a true cornerstone of your home’s warmth.
Your Story, Beautifully Told
There you have it, darling – a comprehensive guide to unlocking the potential of your living room walls and crafting a gallery display that truly speaks to your heart. Remember, your home is your canvas, and every piece you choose, every memory you frame, contributes to the beautiful tapestry of your life. Don’t overthink it; trust your intuition, embrace imperfections, and allow your personality to shine through.
Creating a gallery wall is more than just decorating; it’s an act of self-care, a way to surround yourself with beauty and meaning, transforming your living room into an even more inviting and inspiring haven. So go forth, gather your treasures, and start telling your story. We can’t wait to see the magic you create!
Recommended Resources
Learn more about this topic in How To Communicate Better With Your Partner at Sometimes Daily.
Check out How To Remove Makeup Properly Guide on Fashion Goggled for a deeper dive.