

















How to Store Fresh Herbs: The Ultimate Guide for 2026 Home Cooks
There is nothing quite like the aromatic burst of fresh basil on a Margherita pizza or the bright, peppery kick of cilantro folded into a street taco. However, for many home cooks, the joy of buying fresh herbs is often followed by the disappointment of finding a slimy, blackened mess in the back of the refrigerator just three days later. It feels like a race against time that the herbs always win. Whether you are harvesting from your own 2026 smart garden or picking up bundles from the local farmer’s market, learning how to store fresh herbs properly is a fundamental culinary skill that saves money, reduces food waste, and elevates your cooking from average to extraordinary. In this comprehensive guide, we will explore the science of herb preservation, categorizing varieties by their unique needs and providing step-by-step instructions to keep your greens vibrant for weeks rather than days.
Understanding the Two Main Categories: Soft vs. Hard Herbs
Before you tuck your herbs away, you must understand that not all greens are created equal. In the culinary world, we divide herbs into two primary categories: soft herbs and hard (or woody) herbs. Treating a delicate sprig of cilantro the same way you treat a robust branch of rosemary is a recipe for premature decay.
#
Soft Herbs
Soft herbs are characterized by tender, edible stems and thin leaves. These varieties are high in moisture and very sensitive to temperature fluctuations and bruising. This category includes:
* Cilantro
* Parsley (Flat-leaf and Curly)
* Basil
* Dill
* Mint
* Tarragon
Because these herbs are thin-skinned, they lose moisture quickly through transpiration. However, they are also prone to “drowning” if they sit in too much stagnant water. The goal with soft herbs is to provide a consistent source of hydration while maintaining airflow.
#
Hard Herbs
Hard herbs, also known as woody herbs, have tough, fibrous stems and often possess resinous or needle-like leaves. These herbs are generally more hardy and can withstand colder temperatures and lower humidity better than their soft counterparts. This category includes:
* Rosemary
* Thyme
* Oregano
* Sage
* Chives (though technically soft, they often store better using hard-herb methods)
Hard herbs thrive when kept slightly damp but protected from the direct, drying air of the refrigerator. Understanding this distinction is the first step toward a more sustainable and flavorful 2026 kitchen.
The “Bouquet” Method: Best for Soft Herbs (Except Basil)
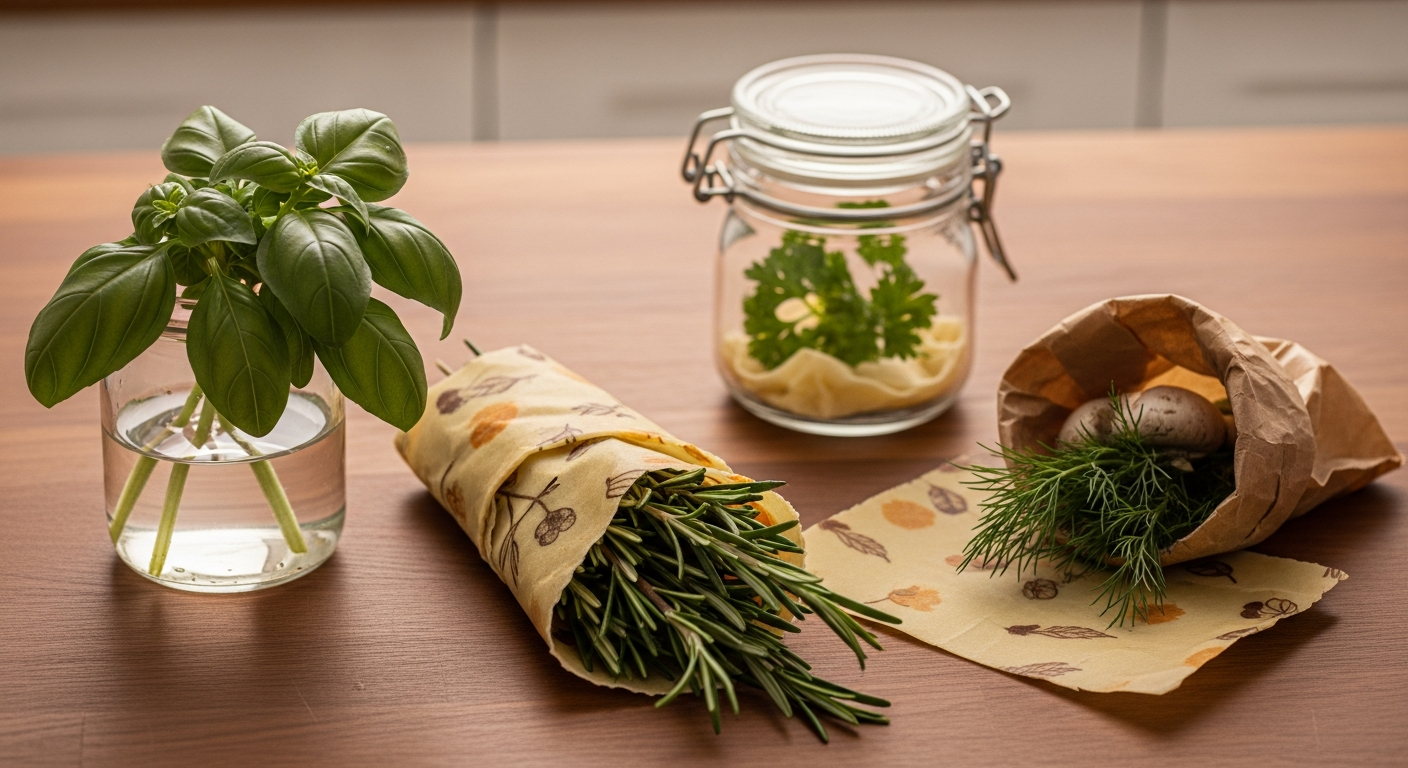
For most soft herbs like parsley, cilantro, and dill, the “bouquet” method is the gold standard. This technique treats the herbs much like fresh-cut flowers, allowing them to draw up moisture through their stems while keeping the leaves dry and ventilated.
#
Step-by-Step Bouquet Storage:
1. **Trim the Stems:** Just as you would with roses, snip about half an inch off the bottom of the herb stems at an angle. This opens up the vascular system of the plant, allowing for better water uptake.
2. **The Water Vessel:** Fill a glass jar or a heavy-bottomed glass with about one to two inches of fresh, cool water. Avoid using too much water; you only want the submerged stems to be wet, not the leaves.
3. **Remove Lower Leaves:** Ensure no leaves are submerged in the water. Leaves underwater will rot quickly, creating bacteria that will kill the entire bunch.
4. **The Tent:** Place a clean, dry plastic bag (or a reusable silicone bag) loosely over the top of the herbs. This creates a high-humidity microclimate that prevents the leaves from wilting in the dry refrigerator air.
5. **Refrigerate:** Place the jar in the main body of the refrigerator. Change the water every two days to keep it fresh and free of bacterial growth.
#
The Basil Exception
Basil is the “diva” of the herb world. It is highly sensitive to cold; placing basil in the refrigerator will turn the leaves black within hours due to chilling injury. To store basil, use the bouquet method but leave the jar on your **kitchen counter** in a spot with indirect sunlight. Treated this way, basil can stay fresh for up to ten days.
The Damp Paper Towel Method: Best for Hard Herbs
Hard herbs do not require a constant source of standing water. In fact, submerging them can often lead to mold. Instead, they prefer a stable, humid environment that mimics the damp earth of a garden.
#
The Rolling Technique:
1. **Preparation:** Do not wash the herbs until you are ready to use them. Excess moisture is the enemy of long-term storage.
2. **The Wrap:** Take a slightly damp (not soaking wet) paper towel or a thin flour-sack kitchen towel. Lay the woody herbs in a single layer across the towel.
3. **The Roll:** Gently roll the towel up like a cigar. This keeps the herbs separated and ensures every leaf is in contact with a small amount of moisture.
4. **The Container:** Place the rolled towel inside a resealable plastic bag or an airtight glass container. Squeeze out as much air as possible before sealing.
5. **Placement:** Store this in the crisper drawer of your refrigerator. The airtight environment prevents the fridge’s intake fans from sucking the moisture out of the herbs, while the damp towel provides just enough hydration to keep the oils stable.
Using this method, rosemary and thyme can often last for three to four weeks, maintaining their potency and structural integrity for all your 2026 roasting and stewing needs.
Freezing and Oil Preservation: Long-Term Solutions
If you find yourself with a surplus of herbs that you won’t be able to use within a week or two, freezing is an excellent way to lock in flavor. While frozen herbs lose their structural crispness (meaning they aren’t great for garnishes), their flavor remains intact for cooked applications.
#
The Herb Cube Method
This is perhaps the most efficient way to store herbs for soups, stews, and sauces.
* **Chop:** Finely mince your herbs (this works for both soft and hard varieties).
* **Tray:** Fill the compartments of an ice cube tray about halfway with the chopped herbs.
* **Oil or Water:** Top off the compartments with either extra virgin olive oil or melted unsalted butter. You can also use water, but oil helps preserve the fat-soluble flavor compounds better and prevents freezer burn.
* **Freeze:** Once frozen solid, pop the cubes out and store them in a labeled freezer bag. When you’re ready to cook, simply drop a cube into your hot pan or pot.
#
The “Log” Method for Compound Butters
For herbs like parsley, chives, or tarragon, creating a compound butter is a gourmet storage solution. Mix softened butter with minced herbs and a pinch of salt. Roll the butter into a log using parchment paper and freeze. You can slice off a “coin” of herb butter to melt over grilled steaks or steamed vegetables throughout the year.
The Science of Longevity: Why Herbs Decay
To truly master herb storage in 2026, it helps to understand the biology of the plant. Once an herb is cut, it is essentially a dying organism. Three main factors accelerate this decay:
1. **Ethylene Gas:** Some fruits and vegetables (like apples and bananas) emit ethylene gas as they ripen. Herbs are highly sensitive to this gas, which causes them to yellow and wilt. Always store your herbs away from the fruit bowl.
2. **Oxidation:** When leaves are bruised or cut, their enzymes react with oxygen, causing browning. This is why you should handle herbs gently and avoid pre-chopping them before storage.
3. **Respiration:** Even when cut, herbs “breathe.” If they are trapped in a bag with no air, they will essentially suffocate in their own moisture, leading to rot. If they have too much air, they dry out. The methods described above—the bouquet and the damp wrap—are designed to balance this respiration.
By controlling these three variables, you can extend the life of your produce significantly, ensuring your 2026 kitchen is always stocked with the brightest flavors.
FAQ: Common Questions About Herb Storage
#
1. Should I wash my herbs as soon as I get home?
Generally, no. Moisture is the primary catalyst for mold and bacterial growth. It is best to store herbs “dirty” and wash them immediately before use. If your herbs are particularly sandy (like cilantro often is), wash them, but ensure they are 100% dry using a salad spinner and air-drying before attempting to store them.
#
2. Can I use a vacuum sealer for fresh herbs?
Vacuum sealing is excellent for hard herbs like rosemary or thyme if you intend to freeze them. However, for fresh storage in the fridge, vacuum sealing can bruise delicate soft herbs and create an anaerobic environment that may promote the growth of certain bacteria. Stick to the bouquet or towel methods for refrigerated storage.
#
3. How do I know when fresh herbs have gone bad?
Trust your senses. If the leaves are slimy to the touch, have turned dark brown or black, or have a sour, fermented smell, they should be discarded. A little bit of wilting is fine—you can often “revive” wilted soft herbs by submerging them in an ice-water bath for 15 minutes.
#
4. Are store-bought “herb savers” worth the investment in 2026?
Many modern herb savers are essentially refined versions of the bouquet method. They provide a water reservoir and a plastic pod for airflow. If you have the cabinet space and use a lot of herbs, they can be very convenient. However, a simple mason jar and a plastic bag achieve the same results for a fraction of the cost.
#
5. Can I dry my own herbs at home?
Absolutely. Hard herbs like oregano, thyme, and rosemary dry beautifully. You can hang them upside down in a cool, dry place or use a dehydrator on the lowest setting. Soft herbs like basil and cilantro tend to lose most of their flavor when dried, so freezing is a better option for those varieties.
Conclusion
Mastering the art of storing fresh herbs is a transformative step for any home cook. By distinguishing between soft and hard herbs and applying the bouquet or damp-towel methods, you can turn a three-day shelf life into a three-week window of culinary possibility. In the kitchen of 2026, where sustainability and quality ingredients are paramount, reducing food waste is just as important as the recipe itself. No longer do you have to fear the “herb graveyard” in your crisper drawer. With these techniques in your repertoire, you can confidently buy or grow a wide array of greens, knowing that every leaf will provide the maximum aromatic impact to your dishes. Happy cooking, and may your kitchen always be filled with the scent of fresh, vibrant herbs.