















How to Braise Meat Perfectly: The Ultimate Guide for Home Cooks
Braising is often described as the “soul” of home cooking. It is a technique that transforms the humblest, toughest cuts of meat into fork-tender masterpieces that melt in your mouth. Whether it’s a wine-drenched coq au vin, a spicy lamb shank, or a classic pot roast, the magic of braising lies in its simplicity and its transformative power. As we head into 2026, the trend toward “slow living” and mindful cooking has brought this age-old method back to the forefront of modern kitchens. Braising isn’t just a way to prepare food; it’s a way to infuse deep, complex flavors into a single pot while you go about your day. If you have ever struggled with dry, stringy meat or a flavorless sauce, this guide is for you. Mastering the art of the braise requires a mix of patience, the right tools, and an understanding of the science behind the steam.
The Science of the Braise: Why Low and Slow Works
To braise meat perfectly, you must first understand what is happening inside the pot. Braising is a “combination cooking” method, meaning it utilizes both dry heat (searing) and moist heat (simmering in liquid). The primary goal of braising is to break down connective tissue—specifically collagen—without drying out the muscle fibers.
Unlike a ribeye steak, which is tender and low in connective tissue, cuts used for braising (like chuck, shank, or shoulder) are full of tough collagen. If you were to grill a piece of beef chuck, it would be nearly impossible to chew. However, when subjected to low, steady heat in a moist environment, collagen undergoes a chemical transformation called hydrolysis. It dissolves into gelatin. This gelatin coats the muscle fibers, giving the meat a silky, succulent mouthfeel and creating a rich, body-heavy sauce.
The “perfect” braise happens at a temperature just below boiling—typically between 275°F and 325°F (135°C to 165°C) in the oven. If the liquid boils too vigorously, the muscle fibers will tighten and squeeze out their moisture before the collagen has a chance to melt, resulting in meat that is simultaneously tough and dry. Consistency and temperature control are the pillars of braising excellence.
Selecting the Best Cuts for Braising
Not all meat is created equal when it comes to the Dutch oven. In fact, the most expensive “prime” cuts of meat are often the worst candidates for braising. Because lean cuts like filet mignon or pork tenderloin lack connective tissue and fat, they become chalky and dry when cooked for long periods.
For a perfect braise, you want the “working muscles” of the animal. These are the parts that move the most and, therefore, develop the most flavor and collagen. Look for:
* **Beef:** Chuck roast, short ribs, brisket, and oxtail. These cuts are marbled with fat and loaded with connective tissue.
* **Pork:** Pork shoulder (Boston butt), pork cheeks, and picnic roast.
* **Lamb:** Lamb shanks, neck, or shoulder. The marrow in the bone of a shank adds an incredible depth to the finished sauce.
* **Poultry:** Chicken thighs or drumsticks. Avoid chicken breasts, as they lack the fat content to withstand the long cooking time.
When selecting your meat, look for deep color and significant marbling (white flecks of fat). Don’t be afraid of the bone; bone-in cuts provide more flavor and help regulate the internal temperature of the meat during the long cook.
Essential Equipment: The Gear You Need
While you can technically braise in any pot with a lid, certain tools will significantly improve your results.
1. **The Enameled Cast Iron Dutch Oven:** This is the gold standard for braising. Cast iron retains heat exceptionally well, ensuring a steady temperature even if your oven fluctuates. The enamel coating makes it non-reactive (important when using acidic braising liquids like wine or tomatoes) and easy to clean.
2. **A Tight-Fitting Lid:** Moisture loss is the enemy of a good braise. A heavy lid that fits snugly will keep the steam inside the pot, creating a self-basting environment. Some chefs even place a piece of parchment paper or aluminum foil between the pot and the lid to create an airtight seal.
3. **Tongs and a Splatter Guard:** Searing meat at high temperatures can be messy. High-quality tongs allow you to turn heavy roasts without piercing the meat, and a splatter guard keeps your stovetop clean.
4. **A Fine-Mesh Strainer:** Once the meat is done, you’ll want to strain the vegetables and aromatics out of the liquid to create a smooth, restaurant-quality sauce.
The Six Golden Steps to a Perfect Braise
To achieve consistent success, follow this time-tested workflow. Every step is designed to layer flavor and manage texture.
#
1. The Prep and Seasoning
Always pat your meat bone-dry with paper towels before cooking. Moisture on the surface of the meat creates steam, which prevents browning. Once dry, season generously with kosher salt. Salt doesn’t just add flavor; it helps break down proteins and allows the meat to retain moisture during the long cook.
#
2. The Sear (The Maillard Reaction)
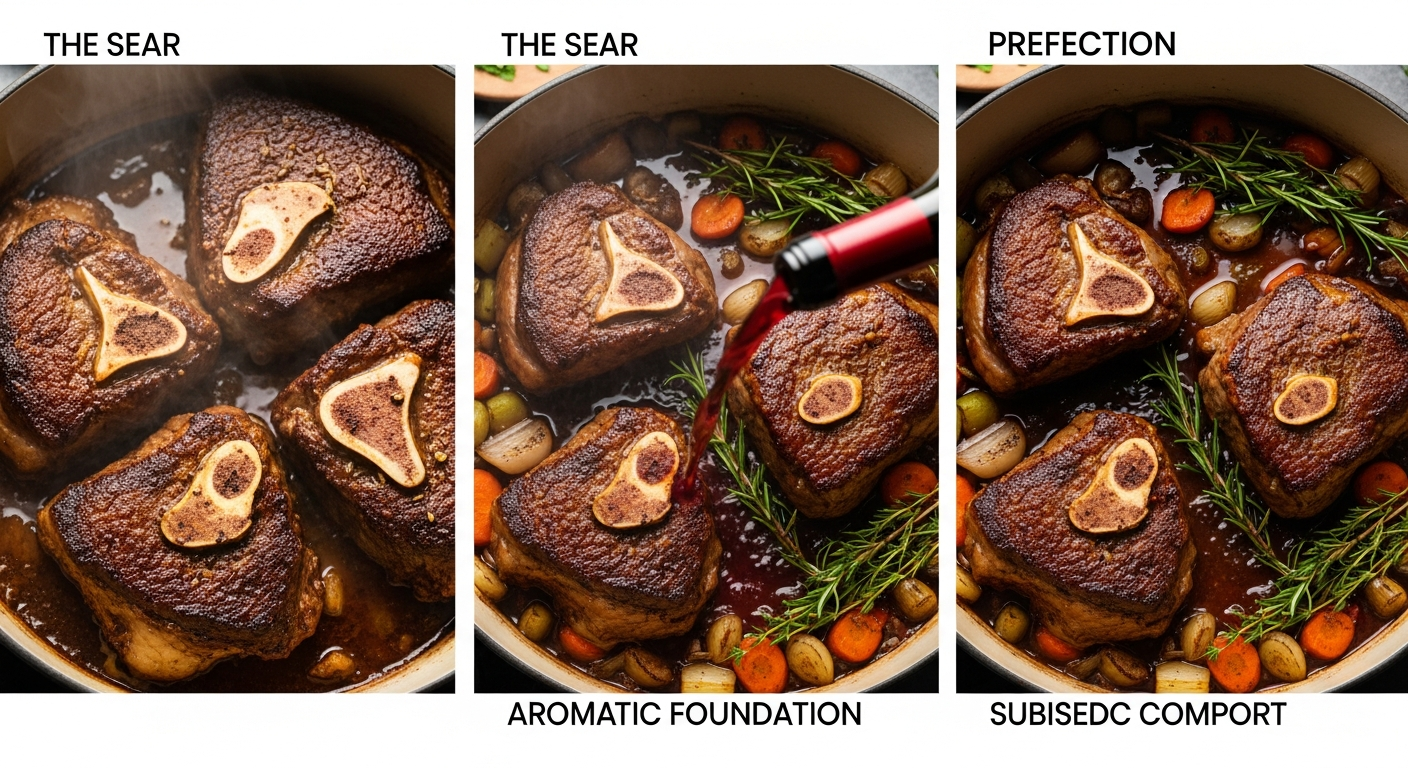
Heat oil in your Dutch oven over medium-high heat. Sear the meat on all sides until a deep, dark brown crust forms. This is the Maillard reaction—a chemical reaction between amino acids and reducing sugars that creates hundreds of different flavor compounds. Do not crowd the pan; if necessary, sear the meat in batches.
#
3. Sautéing the Aromatics
Remove the meat and set it aside. In the rendered fat, add your “mirepoix” (usually onions, carrots, and celery). Sauté until the vegetables are softened and slightly caramelized. This creates the flavor base for your sauce. This is also the time to add garlic, tomato paste, or hardy herbs like rosemary and thyme.
#
4. Deglazing the Pan
The brown bits stuck to the bottom of the pan are called “fond,” and they are pure flavor gold. Pour in a splash of liquid—wine, broth, or even water—and scrape the bottom of the pan with a wooden spoon. This incorporates those caramelized proteins back into the sauce.
#
5. The Liquid Addition
Return the meat to the pot. Add your braising liquid until it comes about **one-third to halfway up the side of the meat**. A common mistake is submerging the meat entirely. If you cover the meat completely, you are boiling it, not braising it. The exposed top of the meat will brown further in the oven’s dry heat, while the submerged part becomes tender.
#
6. The Low and Slow Simmer
Cover the pot and transfer it to a preheated oven (typically 300°F). Check it occasionally to ensure the liquid is at a very gentle simmer—just a few bubbles breaking the surface. Cooking time varies, but most large roasts take 3 to 4 hours. The meat is done when it is “fork-tender,” meaning a fork slides in and out with zero resistance.
Enhancing Flavor: Aromatics, Liquids, and Deglazing
While the technique remains the same, the flavors of a braise are limited only by your imagination. The choice of braising liquid is the most significant flavor driver.
* **Red Wine:** Ideal for beef and lamb. Use a dry, medium-bodied wine like Cabernet Sauvignon or Syrah. The acidity in the wine helps cut through the richness of the fat.
* **White Wine:** Perfect for chicken or pork. A crisp Sauvignon Blanc or Pinot Grigio adds brightness and floral notes.
* **Beer:** Stout or porter adds a chocolatey, earthy depth to beef stews, while an amber ale works beautifully with pork.
* **Stocks and Broths:** Always use low-sodium stock so you can control the salt level as the liquid reduces.
Don’t forget the “finishing touch.” A braise can sometimes taste “heavy” or “muddy” after hours in the oven. To brighten the flavors before serving, add a splash of acidity—lemon juice, apple cider vinegar, or a splash of fresh wine. A handful of fresh herbs (parsley, chives, or tarragon) added at the very end provides a necessary pop of color and freshness.
Troubleshooting: Common Braising Pitfalls
Even experienced cooks can run into trouble. Here is how to avoid the most common mistakes:
* **The Meat is Tough:** If your meat is still tough after the allotted time, it likely needs more time. Collagen breakdown is a function of time and temperature. Give it another 30-45 minutes.
* **The Meat is Dry:** This happens if the liquid was boiling too hard or if you used a cut that was too lean. Next time, lower the oven temperature.
* **The Sauce is Greasy:** Braising cuts are fatty. If your sauce has a thick layer of oil on top, use a wide spoon to skim it off, or use a fat separator. Alternatively, make the braise a day in advance, refrigerate it, and lift the hardened fat off the top the next morning.
* **The Sauce is Too Thin:** If your meat is done but the sauce is watery, remove the meat and vegetables and boil the liquid on the stovetop until it reaches your desired consistency. You can also whisk in a “beurre manié” (equal parts softened butter and flour) for a glossy, thick finish.
Frequently Asked Questions (FAQ)
#
1. Can I braise meat in a slow cooker instead of an oven?
Yes, you can. However, the oven is generally superior because it provides directional heat from all sides, which helps reduce the sauce and brown the exposed meat. If using a slow cooker, use slightly less liquid, as there is almost no evaporation in a sealed slow cooker.
#
2. Should I keep the meat whole or cut it into chunks?
It depends on the dish. A whole pot roast makes for a beautiful presentation, while chunks (like for beef bourguignon) increase the surface area for the Maillard reaction, often resulting in more flavor in the sauce.
#
3. Why is my braised meat stringy?
Stringy meat is a sign of overcooking. When the collagen has completely dissolved and the muscle fibers have been cooked too long, they begin to separate into individual strands. To prevent this, start checking the meat for tenderness about 45 minutes before the recipe says it should be done.
#
4. Can I over-sear the meat?
Yes. You want a deep brown, not a black char. If you burn the meat during the searing phase, that bitter, burnt flavor will permeate the entire sauce. If the pan gets too hot, turn the heat down and add a little more oil.
#
5. Is it better to braise a day in advance?
Almost always, yes. Like many stews and soups, braised dishes taste better the next day. The flavors have more time to meld, and the meat absorbs more of the sauce as it cools. It also makes it much easier to remove excess fat from the surface.
Conclusion
Mastering the perfect braise is a rite of passage for any home cook looking to elevate their culinary skills in 2026. It is a technique that rewards patience and attention to detail rather than speed and flashiness. By choosing the right cut of meat, taking the time to develop a deep sear, and maintaining a low, steady temperature, you can create meals that are deeply comforting and sophisticated. The beauty of the braise is that it is forgiving; once the pot is in the oven, the physics of heat and moisture do the heavy lifting for you. So, the next time you find a beautiful piece of beef chuck or a set of lamb shanks at the market, don’t reach for the grill. Reach for your Dutch oven, pour a glass of wine, and let the slow magic of braising transform your kitchen.