









The Ultimate Guide to Sous Vide Cooking for Beginners: Restaurant Quality at Home
For decades, the term “sous vide” was whispered only in the stainless-steel corridors of Michelin-starred kitchens. It was a secret weapon used by world-class chefs to achieve the impossible: a steak that is perfectly pink from edge to edge, or a piece of salmon so tender it melts upon contact with the tongue. However, as we look toward the culinary landscape of 2026, the barrier to entry has completely vanished. What was once a thousand-dollar laboratory setup has evolved into a sleek, affordable countertop revolution accessible to any home cook.
Sous vide, which translates from French to “under vacuum,” is a method of cooking food in a temperature-controlled water bath. Unlike traditional cooking, where you subject food to high heat (like a 450°F oven or a 500°F pan) and hope to pull it out at the exact moment the center reaches its target temp, sous vide brings the food up to the exact temperature you desire—and holds it there. Whether you are a busy professional or a weekend food enthusiast, mastering this technique will forever change the way you look at protein, vegetables, and even desserts.
1. The Science of Precision: Why Sous Vide Works
To understand why sous vide is superior for many dishes, you must first understand the limitations of traditional heat. When you throw a steak onto a scorching hot cast-iron skillet, the exterior is immediately subjected to extreme temperatures. By the time the center of that steak reaches a perfect medium-rare (about 130°F), the outer layers have been overcooked to 200°F or more. This creates the “gray band” of dry, tough meat surrounding a small circle of pink.
Sous vide eliminates this “gradient” of doneness. Because the water bath is set to exactly 130°F, the meat cannot physically get hotter than that. Through the process of thermal immersion, the heat is transferred gently and evenly. This precision allows for the breakdown of connective tissues and collagen over longer periods without ever drying out the muscle fibers.
Furthermore, because the food is sealed in a bag, it cooks in its own juices. In a traditional oven, moisture evaporates into the dry air. In a sous vide bag, those juices stay trapped, intensifying the flavor and ensuring that even notoriously dry cuts—like pork chops or chicken breasts—remain incredibly succulent. In 2026, as we become more conscious of food waste and ingredient quality, the ability to guarantee a perfect result every time is a game-changer for the home kitchen.
2. Essential Equipment for Your Sous Vide Journey
Starting your sous vide journey doesn’t require a kitchen renovation. In fact, most beginners already own half of what they need. Here is the essential kit for getting started:
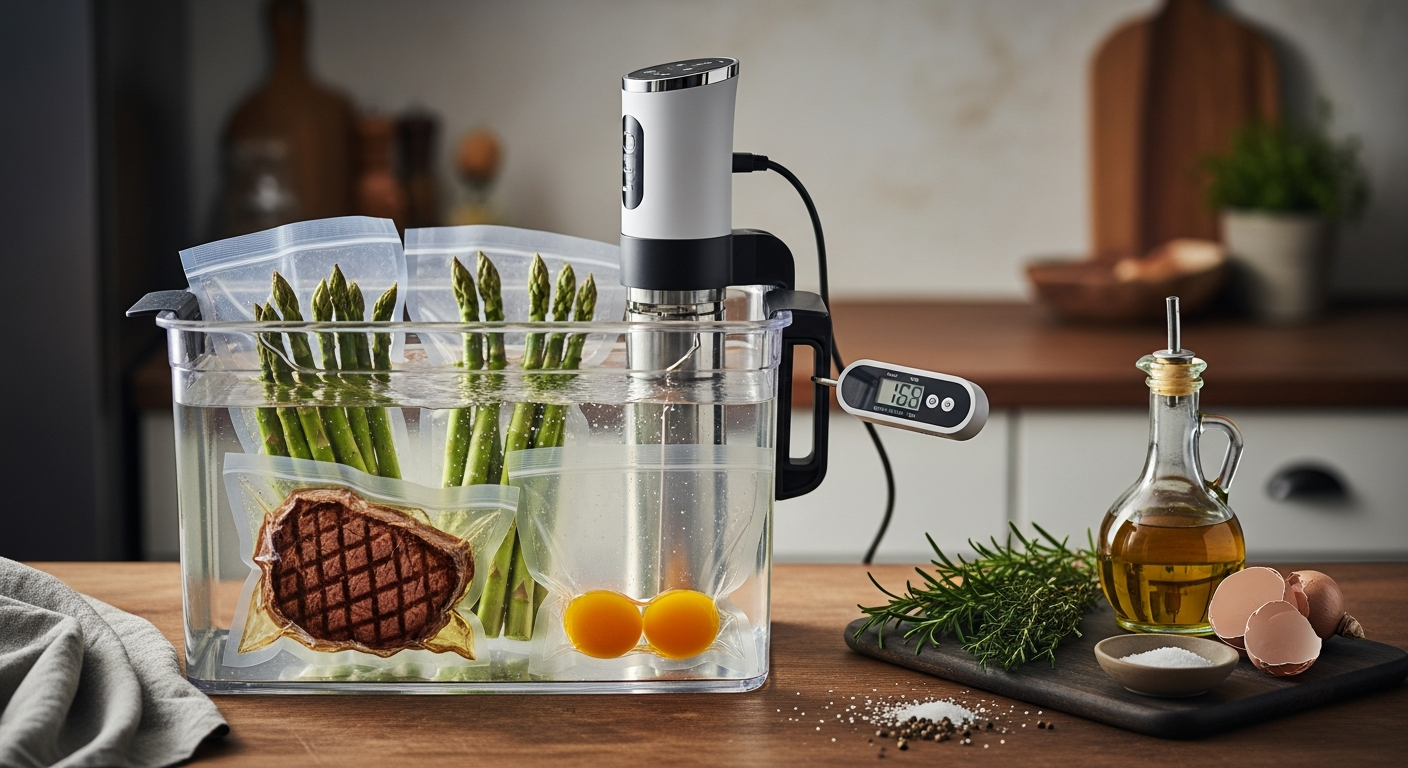
* **The Immersion Circulator:** This is the heart of the operation. It is a wand-like device that sticks into a pot of water. It features a heating element and a small propeller that circulates the water to ensure there are no hot or cold spots. Modern 2026 models are often Wi-Fi enabled, allowing you to monitor your cook from your smartphone.
* **A Container:** You don’t need a dedicated sous vide tank. Any deep stockpot will work. However, many enthusiasts prefer clear polycarbonate containers because they allow you to see the food as it cooks and can be fitted with custom lids to prevent evaporation during long cooks.
* **Bags (Vacuum vs. Manual):** While a vacuum sealer is a fantastic investment, it is not strictly necessary for beginners. High-quality, BPA-free heavy-duty freezer bags work perfectly well.
* **A Searing Tool:** Since sous vide cooks food gently, it doesn’t create a crust. You will need a way to “finish” your meat. A heavy cast-iron skillet is the gold standard, but a propane kitchen torch can also provide that professional char.
3. The Three-Step Process: Seal, Simmer, Sear
Sous vide cooking follows a remarkably simple workflow that reduces the stress of “active” cooking time.
#
Step 1: The Seal
Season your food with salt, pepper, and aromatics like garlic or thyme. Place the food in your bag. If you aren’t using a vacuum sealer, use the **Water Displacement Method**. Simply lower the unsealed bag into the water, allowing the water pressure to push the air out through the top. Once the air is gone and the bag is tight against the food, seal it shut. Removing the air ensures the bag stays submerged and the heat transfers efficiently.
#
Step 2: The Simmer (The Bath)
Set your immersion circulator to the desired temperature and place the bag in the water. One of the greatest benefits here is the “window of perfection.” If a recipe calls for one hour, but you get distracted and leave it for ninety minutes, the food will not overcook. It remains at the target temperature, giving you the freedom to prepare side dishes or enjoy a glass of wine without hovering over the stove.
#
Step 3: The Sear
When you pull the food out of the bag, it won’t look particularly appetizing; it will likely look pale and wet. This is because the Maillard reaction (the chemical reaction that creates a browned crust) requires high heat. Pat the food completely dry with paper towels—moisture is the enemy of a good sear. Quickly flash the meat in a smoking hot pan for 45–60 seconds per side. This gives you the best of both worlds: a perfect interior and a crispy, flavorful exterior.
4. Time and Temperature: A Beginner’s Cheat Sheet
As you begin your 2026 culinary adventures, having a baseline for temperatures is vital. Unlike traditional cooking, thickness—not just weight—determines your cooking time.
* **Steak (Medium-Rare):** 130°F (54.4°C) for 1 to 3 hours. This results in an edge-to-edge buttery texture that is impossible to achieve on a grill.
* **Chicken Breast:** 145°F to 150°F (63°C to 65.5°C) for 1.5 to 4 hours. Most people are used to overcooked 165°F chicken. At 145°F, chicken is safe to eat (due to the duration of the cook) and is shockingly juicy.
* **Pork Chops:** 140°F (60°C) for 1 to 3 hours. Say goodbye to the “hockey puck” pork chops of the past.
* **Salmon:** 122°F (50°C) for 30 to 45 minutes. The texture becomes translucent and incredibly delicate.
* **Vegetables (Carrots/Potatoes):** 183°F (84°C) for 1 hour. High heat is required to break down the pectin in vegetables, resulting in a tender bite that still retains its structural integrity.
5. Common Mistakes and Pro-Tips for Success
Even with the precision of sous vide, there are a few pitfalls that beginners should avoid to ensure their 2026 dinner parties go off without a hitch.
**The Floating Bag Problem:** If your bag contains air or light vegetables, it might float. If the food isn’t fully submerged, it won’t cook evenly or safely. Use a heavy spoon, a dedicated sous vide weight, or even a binder clip attached to a heavy utensil to keep the bag down.
**Not Drying the Meat:** If you take a steak out of the bag and put it straight into a pan, the heat will first have to evaporate the surface moisture before it can start browning the meat. This extra time in the pan will overcook the interior. Always pat your meat “bone dry” before searing.
**Over-Seasoning with Garlic:** Interestingly, raw garlic doesn’t cook well at lower sous vide temperatures and can sometimes develop an “off” metallic flavor. For sous vide, use garlic powder or sauté your fresh garlic slightly before adding it to the bag.
**Safety First:** Always ensure your water bath reaches the target temperature before adding the food. For long cooks (over 4 hours), avoid temperatures below 130°F to stay out of the “danger zone” where bacteria can proliferate.
6. Beyond the Steak: Exploring the Versatility of Sous Vide
While steak is the “gateway drug” for sous vide, the technique’s versatility extends far beyond beef. In 2026, we are seeing a massive trend toward “sous vide meal prepping.” You can season and bag a week’s worth of proteins, cook them all at once, and then store them in the fridge. When you’re ready to eat, a quick 2-minute sear is all that stands between you and a gourmet meal.
**Infusions:** You can use sous vide to make rapid infusions. Want a spicy chili oil or a vanilla-infused bourbon? Place the ingredients in a jar or bag and “cook” them at 135°F for two hours. The heat accelerates the extraction of flavors that would normally take weeks.
**Desserts:** Sous vide is the secret to the perfect crème brûlée or cheesecake. By cooking the custard in individual mason jars in the water bath, you eliminate the risk of curdling or cracking. The result is a silky, uniform texture that is remarkably consistent.
**The Perfect Egg:** The “63-degree egg” is a cult favorite. At 145.5°F (63°C), the egg white sets into a soft, delicate custard while the yolk remains completely liquid. It is the ultimate topping for avocado toast or ramen.
FAQ: Frequently Asked Questions
**Q1: Is cooking in plastic bags safe?**
Yes, provided you use the right bags. Use bags made from polyethylene or polypropylene (like high-quality freezer bags or name-brand vacuum bags). These are BPA-free and stable at the temperatures used in sous vide cooking. Avoid using cheap plastic wraps or thin sandwich bags.
**Q2: Do I need to buy a vacuum sealer immediately?**
No. The water displacement method (using the pressure of the water to push air out of a zipper-lock bag) is more than sufficient for 90% of recipes. A vacuum sealer is helpful for very long cooks or for storing food in the freezer, but it’s not a day-one requirement.
**Q3: Can I leave food in the water bath all day?**
While you have a larger “window” than traditional cooking, you cannot leave food in indefinitely. While the temperature won’t rise, the *texture* will eventually change. A steak left for 12 hours will eventually become mushy as the fibers continue to break down. Stick to the recommended time ranges for the best results.
**Q4: Can I cook frozen food with sous vide?**
Absolutely. This is one of the best features of the method. Simply add about 50% more time to the cook. You can take a frozen, vacuum-sealed steak from the freezer and put it directly into the water bath. It’s the ultimate “I forgot to defrost dinner” solution.
**Q5: How do I clean my immersion circulator?**
Over time, calcium deposits from your water can build up on the heating element. To clean it, run a cycle with a mixture of 50% water and 50% white vinegar at 140°F for about 20 minutes. It will look brand new.
Conclusion: Elevating Your Culinary Future
As we embrace the kitchen technology of 2026, sous vide stands out as the most impactful tool for the home cook. It removes the guesswork, the stress, and the inconsistency that often plagues domestic cooking. By shifting your focus from “watching the clock” to “controlling the temperature,” you unlock a level of quality that was once the exclusive domain of professional chefs.
Whether you are aiming for the perfect medium-rare ribeye, a batch of incredibly creamy yogurt, or a perfectly poached piece of halibut, sous vide provides the path of least resistance. Start with the basics, experiment with flavors in the bag, and don’t forget the power of a good sear. Once you taste the results of precision cooking, you may never want to go back to the “guess and check” method of the past. Welcome to the future of your kitchen—where every meal is a masterpiece.