


The Ultimate Guide: How to Sharpen Kitchen Knives Like a Professional (2026 Edition)
There is a profound sense of satisfaction that comes from gliding a blade through a ripe tomato or a thick cut of brisket without a hint of resistance. For any home cook or food enthusiast, a sharp knife is not just a convenience; it is the most vital tool in the culinary arsenal. Conversely, a dull knife is inefficient, frustrating, and—contrary to popular belief—far more dangerous than a sharp one. When a blade is blunt, it requires more force to cut, increasing the likelihood of the knife slipping and causing a serious injury.
As we move into 2026, the resurgence of traditional craft and high-quality home cooking has made knife maintenance an essential skill. Mastering the art of sharpening allows you to extend the life of your premium cutlery and ensures every meal you prepare is executed with precision. In this comprehensive guide, we will explore the science of the edge, the tools you need, and a step-by-step methodology to keep your kitchen knives in peak condition.
—
Understanding Your Blade: Bevels, Angles, and Steel Types
Before you touch a stone to steel, you must understand what you are working with. Not all knives are created equal, and sharpening them with the wrong technique can do more harm than good. Most kitchen knives are defined by their “bevel”—the surface that has been ground to form the edge.
#
The Angle Matters
The most critical factor in sharpening is the angle. Most Western (German or French) knives, like those from Wusthof or Zwilling, are typically sharpened to a 20-degree angle on each side. These blades are made of “softer” steel (relatively speaking), making them durable and resistant to chipping.
In contrast, Japanese knives (like Shun or Global) often feature a much steeper 15-degree angle or even a single bevel. These are made of harder, high-carbon steel, allowing them to hold a razor-sharp edge for longer, though they are more brittle. In 2026, many “fusion” knives are hitting the market, combining Western ergonomics with Japanese-style 15-degree edges. Always check your manufacturer’s specifications before beginning.
#
The Concept of the “Burr”
Sharpening is the process of removing metal from the blade to create a new, clean edge. When you sharpen one side of the knife, the metal eventually folds over the other side. This microscopic wire edge is called a “burr.” Feeling for the burr is the only way to know you have successfully sharpened down to the very edge of the steel.
—
The Best Tools for the Job: Whetstones vs. Electric Sharpeners
When it comes to sharpening, you have three primary options. While convenience varies, the quality of the edge also differs significantly.
#
1. Whetstones (The Gold Standard)
For food enthusiasts, the whetstone (or water stone) is the undisputed champion. It offers the most control and removes the least amount of metal, preserving the life of your knife. Stones come in different “grits”—lower numbers (400–800) are coarse for repairing chips, medium (1000–3000) are for general sharpening, and high (6000+) are for polishing a mirror-like finish.
#
2. Electric Sharpeners
Modern electric sharpeners have come a long way. They are fast and require little skill. However, they are aggressive. They can “eat” your knife over time and offer less flexibility regarding the sharpening angle. They are best for those who value time over the longevity of their cutlery.
#
3. Pull-Through Sharpeners
Generally, these are the least recommended for high-end knives. They often use tungsten carbide V-shaped notches that “shave” metal off the blade rather than grinding it. While they can provide a quick fix for a cheap utility knife, they can create a jagged, uneven edge on premium steel.
—
Step-by-Step Guide to Sharpening with a Whetstone
If you want a truly professional edge, the whetstone is the way to go. Follow these steps to transform a dull blade into a laser.
#
Step 1: Prepare the Stone
Most water stones need to be soaked in water for 10–15 minutes until bubbles stop rising. Keep a spray bottle of water nearby during the process; the stone must stay wet to lubricate the blade and wash away the “slurry” (metal shavings and stone particles).
#
Step 2: Set Your Angle
Place the stone on a damp towel or a non-slip base. Find your angle—usually 15 or 20 degrees. A helpful trick is to place two quarters on top of each other and rest the spine of the knife on them to visualize a 15-degree angle.
#
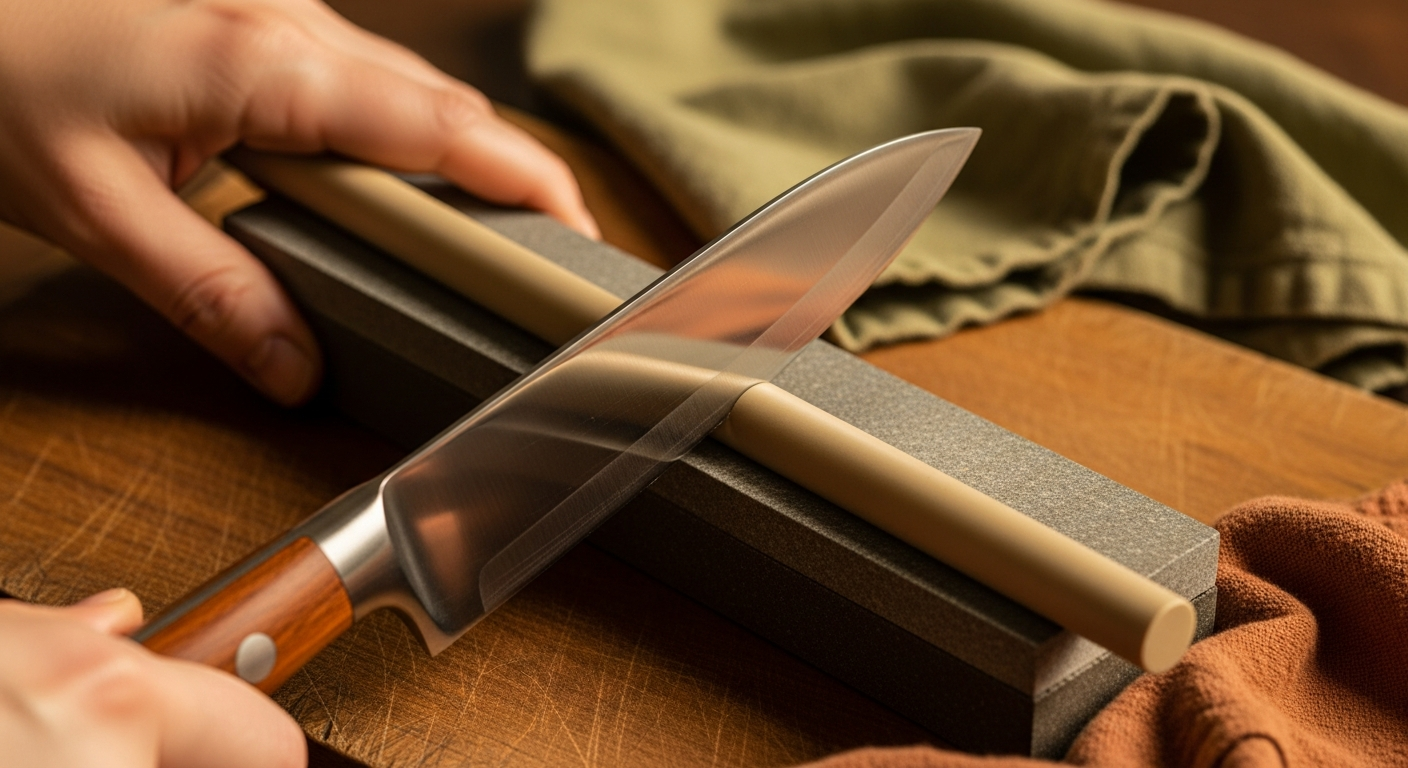
Step 3: The Stroke
Hold the knife handle in your dominant hand and use the fingers of your other hand to apply gentle pressure to the blade near the edge. Starting at the heel of the knife, push the blade away from you across the stone in a sweeping motion, ending at the tip. Maintain a consistent angle throughout the stroke.
#
Step 4: Finding the Burr
Repeat this motion about 10–15 times. Use your thumb to carefully feel the side of the blade facing away from the stone. If you feel a slight “catch” or roughness along the entire length of the blade, you have created a burr. If not, keep going.
#
Step 5: Flip and Repeat
Switch to the other side of the knife and repeat the process until a burr forms on the original side.
#
Step 6: Polishing
Switch to a higher grit stone (3000 or 6000). Use lighter pressure and repeat the strokes. This removes the burr and refines the edge to a surgical sharpness.
—
Maintaining the Edge: The Role of Honing Rods
A common mistake is confusing “honing” with “sharpening.” Sharpening removes metal to create a new edge. Honing simply realigns the existing edge.
As you use your knife, the microscopic teeth of the blade start to fold over. The knife feels dull, but the edge is actually still there—it’s just bent. A honing rod (or “sharpening steel”) pushes those teeth back into a straight line.
#
How to Hone
Hold the honing rod vertically, tip resting on a cutting board. Hold the knife at the same angle you used for sharpening (15 or 20 degrees). Stroke the blade down the rod, moving from heel to tip. Do this 5–10 times per side before every major cooking session.
In 2026, ceramic honing rods have become more popular than traditional steel ones. Ceramic rods are harder and provide a very slight abrasive quality, making them perfect for maintaining the ultra-hard steel used in modern boutique knives.
—
Common Sharpening Mistakes to Avoid
Even seasoned cooks can fall into traps that compromise their blades. Avoid these pitfalls to ensure your knives stay in top shape:
1. **Inconsistent Angles:** This is the #1 mistake. If your angle wobbles from 15 to 25 degrees during a stroke, you will round over the edge rather than sharpening it. Consistency is more important than the specific angle itself.
2. **Using Too Much Pressure:** Let the stone do the work. Excessive pressure can heat the steel (altering its temper) or cause you to slip.
3. **Ignoring the Tip and Heel:** Beginners often focus on the belly of the knife. Ensure your stroke covers the entire length of the blade, or you will end up with a “recurve” shape that makes the knife useless on a flat cutting board.
4. **Not Cleaning the Stone:** A “clogged” stone full of metal particles won’t sharpen effectively. Flatten your stone periodically with a flattening plate to keep it porous and level.
5. **The Dishwasher:** Never put a sharp knife in the dishwasher. The heat, harsh detergents, and rattling against other dishes will dull the edge instantly and can damage the handle.
—
How Often Should You Sharpen Your Knives?
The frequency of sharpening depends on two things: the quality of the steel and how often you use the knife.
* **For the Casual Cook:** If you cook 3-4 times a week, a full whetstone sharpening every 6 to 12 months is usually sufficient, provided you hone the blade regularly.
* **For the Enthusiast:** If you are prep-heavy and use your knives daily, you might want to touch up your edge on a fine-grit stone every 2 to 3 months.
#
The “Paper Test”
Not sure if your knife is dull? Hold a single sheet of printer paper vertically. Try to slice downward through the edge of the paper using only the weight of the knife. If it catches or tears the paper, it’s time for the stones. A truly sharp knife will slice through the paper with a silent, effortless “shhh” sound.
—
Frequently Asked Questions (FAQ)
**Q1: Can I sharpen serrated knives at home?**
Yes, but you cannot use a flat whetstone. You need a ceramic honing rod or a tapered sharpening rod that fits into the individual “gullets” (the curves) of the serrations. You sharpen each serration individually from one side only.
**Q2: Is it worth paying for a professional sharpening service?**
Professional services are great for repairing major damage (like a snapped tip). However, many “pro” sharpeners use high-speed grinding wheels that can remove too much metal. For high-quality kitchen knives, learning to use a whetstone yourself is safer and more rewarding.
**Q3: What grit whetstone should I buy first?**
If you only buy one stone, a double-sided 1000/6000 grit combination stone is the perfect starter kit for 2026. The 1000 side sharpens, and the 6000 side polishes.
**Q4: Should I use oil or water on my sharpening stone?**
It depends on the stone. “Water stones” (common in Japan) require water. “Oil stones” (common in older Western kits) require honing oil. Never switch between the two on the same stone, as oil will ruin a water stone’s ability to soak.
**Q5: Why does my knife feel dull even after sharpening?**
The most likely reason is that you didn’t create a burr, or you didn’t fully remove the burr during the polishing stage. A “wire edge” left on the blade will make it feel dull or “toothy” and will fold over during the first cut.
—
Conclusion: The Joy of a Sharp Edge
Sharpening your kitchen knives is more than just a chore—it is a meditative practice that connects you to the tools of your craft. In 2026, as we move toward more sustainable and mindful lifestyles, maintaining what we own is more important than ever. A well-maintained knife makes cooking safer, faster, and significantly more enjoyable.
By understanding the geometry of your blade, choosing the right tools, and practicing a consistent whetstone technique, you can elevate your culinary skills to new heights. Don’t be intimidated by the process. Start with an old, cheap knife to build your muscle memory, and soon, you’ll be able to give your premium cutlery the razor-sharp edge it deserves. Happy cooking!


