


The Ultimate Guide to Home Renovation Planning: From Vision to Reality
Crafting Your Renovation Vision: The Foundation of Your Home Transformation
Every successful renovation begins with a clear, compelling vision. Before you even think about knocking down walls or selecting paint swatches, dedicate time to defining what you want to achieve. This initial phase is crucial for aligning your goals with your lifestyle, ensuring the renovated space serves you for years to come.
Define Your “Why” and “What”
- Identify Your Needs & Pain Points: What isn’t working in your current space? Do you need more storage, better flow for entertaining, a dedicated home office, or a spa-like bathroom retreat? List every frustration and desired improvement. For instance, a common desire among our readers is to create open-concept living areas that foster connection, moving away from compartmentalized layouts that feel isolating.
- Envision Your Ideal Lifestyle: How do you want to live in this space? Do you host large gatherings, enjoy quiet evenings with family, or need a serene corner for meditation? Your renovation should support and elevate your daily rituals. Consider a recent client who, inspired by Rock Salt Plum’s wellness content, designed her master bathroom around a freestanding soaking tub and natural light, prioritizing relaxation and self-care.
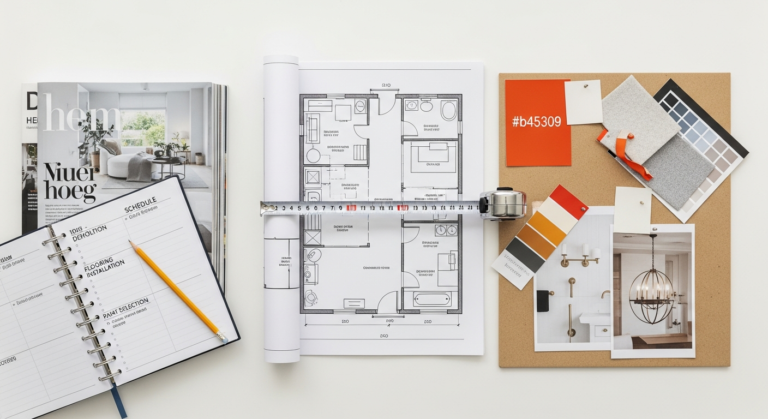
- Explore Aesthetic Preferences: Dive into interior design magazines, Pinterest boards, and Houzz to gather inspiration. Create mood boards that capture the styles, colors, textures, and overall ambiance you desire. Are you drawn to modern minimalism, classic farmhouse, coastal chic, or something entirely unique? Don’t be afraid to mix elements, but strive for a cohesive overall look.
Practical Steps for Vision Building:
- Journal Your Desires: Write down everything you imagine for your renovated home. Be specific about feelings, functions, and aesthetics.
- Create a Digital or Physical Idea Book: Collect images, fabric swatches, material samples, and color palettes that resonate with your vision.
- Prioritize Your Wants vs. Needs: Categorize your desires into “must-haves,” “nice-to-haves,” and “dream-bigs.” This will be vital when budgeting and making design compromises later. A kitchen island with seating might be a “must-have” for family dinners, while a built-in espresso machine could be a “nice-to-have.”
- Assess Your Home’s Potential: Understand the structural limitations and possibilities of your existing home. While your vision might include moving a load-bearing wall, an architect can confirm feasibility and cost implications.
By investing heavily in this initial planning phase, you establish a solid foundation, minimizing costly changes down the line and ensuring your renovation truly embodies your aspirations for a beautiful, functional, and harmonious home.
Mastering Your Renovation Budget: Realistic Planning for Financial Confidence

The budget is the backbone of any successful home renovation. A well-defined and realistic financial plan prevents stress, overspending, and project stalls. It’s not just about how much you can spend, but how wisely you allocate those funds.
Deconstructing Renovation Costs
A typical renovation budget isn’t a single number; it’s a detailed breakdown of various components:
- Design & Planning Fees (5-15%): This includes architects, interior designers, structural engineers, and permit application fees. For a kitchen remodel costing $60,000, expect to allocate $3,000-$9,000 for these professionals.
- Demolition & Site Prep (5-10%): Removal of old structures, debris disposal, and initial site work.
- Materials (30-45%): This is often the largest chunk, covering everything from flooring, cabinetry, countertops, fixtures, appliances, and finishes. High-end materials can significantly inflate this portion. For example, solid hardwood flooring might cost $8-$15 per square foot, while luxury vinyl plank could be $3-$7.
- Labor (25-40%): The cost of skilled tradespeople – carpenters, plumbers, electricians, painters, tilers. Labor rates vary widely by region and contractor experience.
- Contingency Fund (10-20%): This is non-negotiable. Unexpected issues WILL arise – faulty wiring behind a wall, an uneven subfloor, or unforeseen structural repairs. A minimum 10% contingency is prudent, with 15-20% recommended for older homes or extensive remodels. A $100,000 renovation should ideally set aside $10,000-$20,000 for unknowns.
- Miscellaneous Costs (2-5%): Temporary living expenses if you need to move out, storage unit rentals, cleaning services, landscaping adjustments, and décor for the new space.
Practical Steps for Budgeting:
- Research & Get Quotes: Start by researching average renovation costs in your area for similar projects. Online calculators can provide a rough estimate, but nothing beats actual quotes from multiple contractors. Aim for at least three detailed bids for comparison.
- Prioritize & Allocate: Revisit your “wants vs. needs” list. Decide where you’re willing to splurge (e.g., high-quality kitchen appliances or a luxurious master bath) and where you can economize (e.g., standard tile instead of custom mosaic, open shelving instead of all upper cabinets).
- Track Every Expense: Use a spreadsheet or a dedicated budgeting app to meticulously track every dollar spent. This helps you stay on target and make informed adjustments if costs start to creep up.
- Understand Financing Options: Explore home equity lines of credit (HELOCs), home equity loans, or personal loans if you need external financing. Consult with a financial advisor to understand the best option for your situation and credit score. Interest rates and repayment terms are critical considerations.
- Be Prepared for “Change Orders”: Any deviation from the original plan or materials requested after the project starts is a change order, and it will cost you. Document every change in writing and get an updated cost estimate before proceeding.
A transparent and well-managed budget is your most powerful tool in ensuring your home renovation planning guide takes you to a place of financial confidence and not stress. It allows you to make informed decisions that align with your financial comfort while still achieving your desired aesthetic and functional goals.
Building Your Renovation Dream Team: Selecting the Right Professionals
A successful renovation isn’t a solo endeavor; it’s a collaborative effort. Assembling a skilled, trustworthy team of professionals is paramount. The right architect, designer, and contractor will translate your vision into reality, navigate complexities, and ensure quality execution.
Key Players in Your Renovation Journey:
- Architect (For Structural Changes & Major Layout Reconfigurations):
- When to hire: If you’re altering the building’s footprint, moving load-bearing walls, adding an extension, or making significant layout changes.
- What they do: Design the overall structure, produce detailed blueprints, ensure compliance with building codes, and often help with permit applications. They focus on the integrity and functionality of the space.
- Interior Designer (For Aesthetic Vision & Space Planning):
- When to hire: For help with space planning, material selection, color palettes, lighting design, furniture layout, and creating a cohesive aesthetic. They bridge the gap between architectural plans and your personal style.
- What they do: Specialize in the interior environment, selecting finishes (flooring, tile, paint), fixtures (lighting, plumbing), cabinetry, and ensuring the space is both beautiful and highly functional. Many designers also manage procurement of materials and coordinate with contractors.
- General Contractor (The Project Manager & Executor):
- When to hire: For virtually any renovation project, as they oversee the entire construction process.
- What they do: Hire and manage subcontractors (plumbers, electricians, carpenters), schedule work, order materials, ensure the project stays on budget and schedule, handle inspections, and serve as your primary point of contact throughout construction.
Practical Steps for Team Selection:
- Seek Referrals: Start by asking friends, family, and neighbors for recommendations. Online reviews (Houzz, Angie’s List, local community groups) can also be helpful, but always cross-reference.
- Interview Multiple Candidates (3-5): Don’t settle for the first professional you meet. Interview several architects, designers, and contractors to compare their experience, communication style, pricing, and portfolios.
- Check Credentials & Experience:
- Architects: Verify licensure with your state’s architectural board.
- Designers: Look for certifications (e.g., NCIDQ) and portfolios that align with your aesthetic.
- Contractors: Ensure they are licensed, bonded, and insured. Request proof of insurance (liability and workers’ compensation).
- Request References: Always speak to previous clients. Ask about their experience with communication, adherence to budget and timeline, problem-solving skills, and overall satisfaction. Visit past projects if possible.
- Review Contracts Thoroughly:
- Architect/Designer: Understand their fee structure (hourly, flat fee, percentage of project cost) and what deliverables are included (drawings, material specifications, site visits).
- Contractor: Ensure the contract includes a detailed scope of work, payment schedule, timeline, change order process, warranty information, and a clear understanding of what is and isn’t included (e.g., debris removal, final cleaning). Avoid large upfront payments; typically, 10-30% upfront is standard, with progress payments tied to completed milestones.
- Prioritize Communication & Personality Fit: You’ll be spending a lot of time communicating with these individuals. Choose professionals with whom you feel comfortable, who listen to your needs, and who communicate clearly and promptly.
By carefully selecting a professional team, you not only gain expertise but also peace of mind, knowing your significant investment is in capable hands. This critical step in your home renovation planning guide will set the stage for a smoother, more enjoyable project outcome.
The Pre-Construction Phase: Design Development, Material Selection & Permitting

With your vision clear and your team assembled, the pre-construction phase is where the detailed planning truly takes shape. This critical stage involves translating ideas into actionable plans, selecting every finish, and securing the necessary legal approvals.
Detailed Design Development
This is where your architect and/or interior designer will bring your vision to life through drawings and specifications.
- Initial Concepts & Layouts: Review various floor plans and elevations. Provide feedback until you reach a layout that perfectly balances functionality and aesthetics. Don’t be shy about suggesting revisions; this is your chance to fine-tune.
- 3D Renderings & Walkthroughs: Many designers offer 3D renderings, which allow you to virtually “walk through” your new space. This is invaluable for visualizing scale, light, and flow before construction begins.
- Electrical & Plumbing Plans: Detailed plans for outlets, switches, lighting fixtures, and plumbing locations are crucial. Consider smart home technology integration and future needs. Planning for a dedicated charging station in the kitchen or motion-sensor lighting in hallways can significantly enhance daily living.
Material and Finish Selection
Every surface, fixture, and finish needs to be chosen. This can be overwhelming, but approaching it systematically helps.
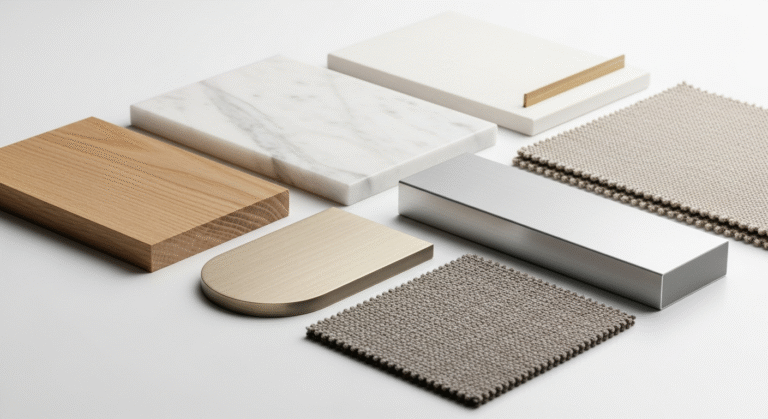
- Create a Materials Board: Physically collect samples of flooring, countertop slabs, cabinet finishes, paint swatches, fabric samples, and tile. Seeing them together in different lighting conditions will help you make cohesive choices.
- Consider Durability & Maintenance: Especially for high-traffic areas like kitchens and bathrooms, prioritize materials that can withstand daily wear and tear and are easy to clean. Quartz countertops, for example, are highly durable and non-porous, making them a popular choice for busy households.
- Shop for Appliances & Fixtures Early: Lead times for custom cabinetry, specific appliances (e.g., a professional-grade range or integrated refrigerator), and unique fixtures can be extensive, sometimes 12-16 weeks or more. Ordering these early prevents delays down the line.
- Factor in Health & Wellness: For Rock Salt Plum readers, selecting low-VOC (Volatile Organic Compound) paints and finishes, natural materials, and promoting good indoor air quality is often a priority.
Navigating the Permitting Process
Permits are legal documents that grant you permission to perform construction work, ensuring your project complies with local building codes, zoning laws, and safety regulations.
- Understand Local Requirements: Regulations vary significantly by city, county, and even neighborhood. Your architect or contractor will usually handle permit applications, but it’s wise to understand the process.
- Allow Ample Time: Obtaining permits can take anywhere from a few weeks to several months, depending on the complexity of your project and the efficiency of your local planning department. Do not start construction until all necessary permits are secured. Proceeding without permits can lead to fines, forced demolition, and difficulties selling your home in the future.
- Required Documentation: You’ll typically need detailed architectural drawings, structural plans, site plans, and sometimes energy efficiency calculations.
Practical Steps for Pre-Construction:
- Finalize All Designs: Ensure every detail is decided and documented before construction bids are finalized. Changes after this point lead to costly change orders.
- Get All Materials Priced & Approved: Have your contractor provide a detailed breakdown of material costs based on your selections.
- Review & Sign Contracts: Once designs and material selections are final, sign the comprehensive contract with your general contractor, which should include all agreed-upon scope, schedule, and payment terms.
- Confirm Permit Status: Regularly check in with your contractor regarding the status of permit applications.
This meticulous preparation during the pre-construction phase is a cornerstone of any effective home renovation planning guide, minimizing surprises and laying a clear path for the physical transformation of your home.
Effective Project Management: Staying on Track During the Build
Even with thorough planning, the construction phase can feel chaotic. Effective project management and clear communication are crucial to keep your renovation on schedule, on budget, and true to your vision. While your general contractor manages the day-to-day, your active involvement ensures alignment.
Establishing Communication Protocols
Poor communication is a leading cause of renovation woes. Proactive and clear communication prevents misunderstandings and delays.
- Designate a Primary Contact: You and your contractor should agree on a single point of contact on both sides to streamline information flow.
- Regular Meetings & Check-ins: Schedule weekly (or bi-weekly) site meetings with your contractor to discuss progress, upcoming tasks, potential issues, and answer any questions. Document these meetings with notes or emails.
- Preferred Communication Method: Agree on how you’ll communicate for urgent matters (phone call/text) versus less urgent updates (email).
- Be Clear and Concise: When communicating decisions or concerns, be direct and provide as much detail as possible.
Monitoring Progress and Quality
Your involvement during construction primarily focuses on oversight and decision-making, not hands-on work.
- Site Visits: Visit the construction site regularly, but respect your contractor’s schedule and safety protocols. Observe progress, but defer specific questions or instructions to your primary contact.
- Review Work Against Plans: Periodically cross-reference the work being done with your approved blueprints and specifications. If something looks off, bring it to your contractor’s attention immediately. For instance, verify that electrical outlets are in the planned locations or that tile patterns are being laid as specified.
- Quality Control: Pay attention to the quality of workmanship. Are cuts clean? Are finishes applied evenly? Don’t hesitate to point out any concerns, allowing your contractor to address them promptly before more work is built upon a faulty foundation.
- Material Deliveries: Keep track of when materials are expected to arrive. Confirm that the correct items and quantities have been delivered before installation.
Managing the Budget and Schedule
Vigilance here is key to avoiding cost overruns and protracted timelines.
- Approve Progress Payments: Pay attention to the payment schedule outlined in your contract. Only release payments when specific milestones have been demonstrably completed to your satisfaction. Withholding final payment until the punch list is complete provides leverage.
- Track Change Orders: As discussed, every deviation from the original plan is a change order. Ensure every change order is documented in writing, includes a clear description of the work, and states the revised cost and impact on the schedule. Sign off on these BEFORE the work proceeds. For example, deciding to add an extra window mid-construction will incur costs for materials, labor, and potential permit revisions.
- Understand Delays: Construction projects are rarely without hitches. Weather, material delays, or unforeseen site conditions can all cause setbacks. While some delays are unavoidable, good contractors will proactively communicate them and offer solutions. Understand what your contract says about delays and their financial implications.
Practical Steps for Project Management:
- Maintain a Project Folder: Keep all contracts, plans, permits, invoices, communication logs, and change orders in one organized place, whether physical or digital.
- Ask Questions: If you don’t understand something, ask. It’s better to clarify early than to discover a costly mistake later.
- Be Respectful, Yet Firm: Treat your team with respect, but don’t shy away from asserting your expectations and holding them accountable to the contract.
By actively engaging in project management during the build, you become a vital part of your renovation’s success, ensuring that the beautiful home you envisioned during your home renovation planning guide becomes a stunning reality, on time and within budget.
Post-Renovation: From Punch List to Personalization
The construction dust has settled, and your renovated space is nearly complete. This final phase, often overlooked in the initial excitement, is crucial for ensuring every detail is perfect, your investment is protected, and your new home truly feels like yours.
The All-Important Punch List
Before making the final payment to your contractor, a thorough walk-through and creation of a “punch list” is essential.
- Detailed Inspection: Walk through every renovated area with your contractor and, if possible, your designer. Scrutinize every detail. Look for:
- Paint touch-ups needed.
- Loose fixtures or handles.
- Scratches or dents on new surfaces.
- Doors and windows that don’t close smoothly.
- Electrical outlets or switches that aren’t working.
- Missing trim or caulk.
- Appliances that aren’t functioning correctly.
- Cleanliness of the site.
Be meticulous; this is your last chance to address issues under the contract.
- Document Everything: Photograph any imperfections or unfinished items. List each item clearly, noting its location. Agree on a timeline with your contractor for completing these outstanding tasks.
- Withhold Final Payment: Do not make the final payment until all items on the punch list have been satisfactorily completed. Typically, 10-15% of the total project cost is withheld until this phase.
Warranties and Documentation
Protecting your investment involves understanding the warranties on materials and workmanship.
- Collect Warranties: Request all product warranties from your contractor for appliances, fixtures, flooring, windows, etc. Keep these in your organized project folder.
- Understand Workmanship Warranty: Your contractor should provide a warranty for their work, typically 1-2 years. Know what it covers (e.g., faulty installation, structural issues) and what it doesn’t.
- Receive Manuals & Maintenance Info: Gather user manuals for all new appliances and systems. Ask for maintenance instructions for specific materials (e.g., how to clean a certain type of countertop or care for wood floors).
The Joy of Personalization and Living In
Once the construction phase is truly over, it’s time for the exciting part: making the space your own.
- Professional Cleaning: Even with daily site cleaning, renovation dust permeates everything. Invest in a professional post-construction deep clean to remove fine dust particles, especially crucial for wellness-focused homes.
- Decorate & Accessorize: Bring in your furniture, art, and personal touches. This is where your interior designer’s selections can truly shine, completing the aesthetic vision.
- Landscape & Exterior Touches: Don’t forget the outside! A refreshed patio, new plantings, or updated outdoor lighting can dramatically enhance curb appeal and your enjoyment of your home.
- Embrace Your New Space: Take time to live in your renovated home. Experience the flow, the light, and the functionality. Observe what works perfectly and what might need minor adjustments (e.g., repositioning a lamp, adding a rug).
Practical Steps for Post-Renovation:
- Final Inspection & Sign-off: Once the punch list is complete, conduct one final walk-through before releasing the final payment.
- Organize Documentation: File all contracts, invoices, warranties, and maintenance guides in an easily accessible location.
- Celebrate Your Achievement: You’ve successfully navigated a complex process! Take a moment to appreciate the transformation and enjoy your beautiful new home.
The post-renovation phase is the culmination of your entire home renovation planning guide. It’s where your careful foresight and execution allow you to fully enjoy the sanctuary you’ve meticulously crafted, ready for a lifetime of memories, wellness, and delightful entertaining.
Essential Tips for a Smooth Home Renovation Planning Guide Experience
Even with the best plans, renovations can throw curveballs. Drawing on years of industry insight and homeowner experiences shared within the Rock Salt Plum community, these essential tips will help you navigate potential challenges and ensure your journey from vision to reality is as smooth as possible.
1. Over-Communicate, Always
Communication is the cornerstone of a successful renovation. Don’t assume anything. If you have a question, ask it. If you have a concern, voice it politely but firmly. Request that all significant decisions, changes, and cost approvals be documented in writing (email is excellent for this). This creates a clear paper trail, preventing “he said, she said” disputes later on. Schedule regular, dedicated check-ins with your contractor and designer.
2. Be Decisive, But Not Hasty
Once construction begins, every decision you make (or delay in making) has a ripple effect on the timeline and budget. While it’s crucial to be decisive about material selections and design elements, avoid making rushed choices. If you’re unsure, ask your designer for a few curated options rather than sifting through endless possibilities. Conversely, once a decision is made and documented, stick to it to avoid costly change orders.
3. Plan for the Unexpected (Beyond the Contingency Fund)
While a financial contingency is vital, also prepare for practical inconveniences. Consider:
- Temporary Living Arrangements: Will you need to move out? How long? Where will you stay, and what’s the cost?
- Dust and Noise: Renovations are inherently messy and loud. Plan strategies to minimize disruption to your remaining living spaces, and notify neighbors of potential noise.
- Impact on Daily Routines: If your kitchen is out of commission, how will you cook? If a bathroom is unusable, what’s your alternative? Set up a temporary “mini-kitchen” with a microwave, toaster oven, and mini-fridge.
4. Understand the Impact on Your Lifestyle and Wellness
Renovations, while exciting, can be stressful. Proactively incorporate wellness strategies:
- Designate a “No-Renovation Zone”: If living on-site, cordon off an area of your home that remains untouched and clean, serving as your sanctuary.
- Schedule Downtime: The constant decision-making and presence of workers can be draining. Schedule regular breaks from the site and mental space.
- Prioritize Self-Care: Don’t let the renovation consume your entire life. Maintain routines for exercise, healthy eating, and relaxation.
5. Don’t Compromise on Permits or Insurance
Never allow work to proceed without the necessary permits. This can lead to serious legal and financial repercussions, including fines, removal of unpermitted work, and complications with home insurance or resale. Similarly, ensure your contractor has adequate liability and workers’ compensation insurance. Request certificates of insurance directly from their providers. This protects you from financial responsibility if an accident occurs on your property.
6. Prioritize Energy Efficiency and Long-Term Value
7. Be a Good Client
Treat your renovation team with respect. Offer water or coffee, provide clear access to the work site and utilities, and pay invoices promptly when milestones are met. A positive working relationship fosters better communication, more meticulous work, and a team that genuinely wants to deliver the best results for you.
By integrating these practical tips into your comprehensive home renovation planning guide, you’re not just preparing for a construction project; you’re setting the stage for a transformative experience that culminates in a home perfectly tailored to your desires for beauty, functionality, and enduring peace.
Frequently Asked Questions
Conclusion: Your Beautiful Home Awaits
Embarking on a home renovation is an investment not just in your property, but in your lifestyle, comfort, and well-being. By meticulously following this comprehensive home renovation planning guide, you’ve gained the tools and insights to navigate every stage, from the initial spark of inspiration to the satisfying reality of a transformed space. We’ve covered everything from defining your vision and mastering your budget to assembling a dream team and meticulously managing the build. Your home is a reflection of you, a place where memories are made, and where wellness is cultivated.
Now, with a clear roadmap in hand, it’s time to take the first step. Revisit your personal vision board, prioritize your goals, and start researching local professionals. The journey to your dream home begins with a single, well-planned decision. With Rock Salt Plum as your trusted resource, you’re poised to create a home that truly elevates your life. Your beautifully renovated sanctuary awaits!