


The Heart of the Home: Designing Your Dream Kitchen Island for Every Space
The Mighty Micro-Island: Clever Solutions for Small Kitchens
Don’t let a compact kitchen deter your island dreams! Small spaces often inspire the most ingenious and charming solutions. The key here is multifunctionality, mobility, and smart scale. Think of your micro-island not as a chunky fixture, but as a graceful, hardworking companion that adapts to your needs.
Embrace Mobility: The Cart and Trolley Revolution
For truly tiny kitchens, a mobile island on wheels is an absolute game-changer. These delightful pieces offer invaluable prep space when you need it and can be tucked away or moved to a different spot when you don’t.
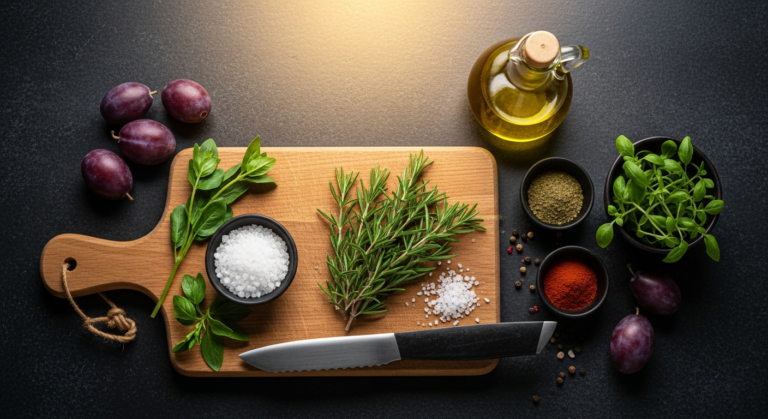
* Butcher Block Carts: A classic for a reason! A sturdy butcher block top provides an excellent surface for chopping and food prep, while lower shelves or drawers can house extra pots, pans, or frequently used appliances like a stand mixer. Look for options with locking casters for stability. They add a wonderful, rustic warmth that feels so inviting.
* Stainless Steel Prep Tables: For a more industrial or professional look, a slim stainless steel table offers incredible durability and hygiene. Many come with adjustable shelves, perfect for storing large bowls or serving platters. Their sleek profile often makes a small space feel less cluttered.
* Multi-Tiered Trolleys: These can be incredibly versatile, offering multiple surfaces for different tasks. Imagine one tier for prep, another for holding ingredients, and a third for displaying a lovely vase of flowers or a stack of cookbooks.
Slim & Trim: Fixed Islands Designed for Efficiency
If you have just a sliver more space, a permanently fixed, narrow island can provide significant utility without overwhelming the room.
* Breakfast Bar Extension: Integrate a slim island that doubles as a breakfast bar. A countertop that extends slightly beyond the base cabinetry on one side allows for stools to be tucked underneath, providing a casual dining spot without needing a separate table. Opt for backless stools or those that can be neatly slid away to save visual and physical space.
* Smart Storage Integration: Even the smallest fixed island can be a storage powerhouse. Think about pull-out spice racks, slim pantry cabinets, or open shelving for displaying your prettiest dishes. Vertical storage is your best friend in a small kitchen, so maximize every inch from floor to ceiling.
Tip for Small Spaces: Always measure your clearances! You’ll want at least 36 inches (ideally 42 inches) between your island and surrounding countertops or walls to ensure comfortable movement and appliance access. In a truly tiny kitchen, even 30 inches might be workable if it’s not a primary thoroughfare, but aim for more if possible.
Maximizing Modest Spaces: Smart Islands for Medium-Sized Kitchens

For those with a bit more breathing room than a micro-kitchen, but not quite the expanse of a grand estate, the medium-sized kitchen offers a sweet spot for a truly functional and beautiful island. Here, you can move beyond just the basics and start integrating more permanent features that enhance both form and function.
The Goldilocks Island: Just Right in Scale and Function
The key to a successful island in a medium-sized kitchen is finding the “just right” balance. It should feel substantial enough to be a focal point, but not so large that it impedes flow or makes the room feel cramped.
* Thoughtful Dimensions: Work with your kitchen’s natural flow. A standard island depth is usually 24-36 inches, but you might stretch to 42 inches if space allows. Length can vary widely, but aim for something that mirrors the scale of your surrounding cabinetry. Sketching out the footprint on your floor with painter’s tape can be incredibly helpful for visualizing.
* Integrated Appliances: This is where a medium island truly shines. Consider built-in appliances that enhance convenience without cluttering your main countertops.
* Microwave Drawer: Tucked neatly into the island cabinetry, a microwave drawer is ergonomic, keeps the microwave off the counter, and offers a sleek, integrated look.
* Under-Counter Fridge/Freezer Drawers: Perfect for snacks, beverages, or meal prep ingredients, these can free up space in your main refrigerator and make entertaining a breeze.
* Dishwasher: If your main sink is on the island, integrating a dishwasher here makes perfect sense for workflow.
* Sink or Prep Zone: A secondary prep sink on your island can revolutionize your kitchen’s efficiency, especially if you have multiple cooks. Even without a sink, designating a section of your island for prep, complete with a built-in cutting board or pull-out waste bin, can be incredibly practical.
Seating & Social Hubs: Bridging the Gap
Your medium island is perfectly positioned to become a beloved gathering spot.
* Breakfast Bar Extension: A 12-15 inch overhang on one side is generally sufficient for comfortable seating at counter-height stools. This creates an informal dining area, a spot for kids to do homework while you cook, or a place for guests to perch during gatherings.
* Varying Heights: Consider a multi-level island. A lower section for dining or a dedicated workspace, and a higher section for prep, can add visual interest and distinct functionality. This creates a natural division of tasks and offers flexibility.
* Open Shelving for Display: Incorporate open shelves on one end or side of your island. This is a beautiful opportunity to display cookbooks, decorative ceramics, or even a small collection of plants. It adds personality and prevents the island from feeling like a monolithic block.
Design Insight: For a cohesive look, try to match your island’s cabinetry or countertop materials to your main kitchen elements. However, don’t be afraid to introduce a complementary color or material for the island to make it a subtle statement piece – perhaps a deep navy island in a white kitchen, or a butcher block top on an otherwise stone-clad space.
Grand Statements: Luxurious Islands for Large Kitchens
Ah, the expansive kitchen! Here, your imagination can truly soar. A large kitchen island isn’t just about size; it’s about creating multiple zones, maximizing luxury, and designing a true command center for your culinary and entertaining endeavors. This is where you can craft an island that is not only breathtakingly beautiful but also incredibly powerful in its functionality.
The Epicenter of Everything: Oversized & Multi-Zoned Islands
With ample space, your island can become a microcosm of your entire kitchen, encompassing various functions and elevating the aesthetic.
* The Double Island Dream: If your kitchen is truly vast, consider the ultimate luxury: two islands! One can be dedicated to serious prep and cooking (perhaps with a secondary sink, range, or even a warming drawer), while the other serves as an entertainment hub with seating, a beverage fridge, and ample serving space. This creates an incredibly efficient workflow and separates messy cooking from elegant entertaining.
* Sprawling Single Islands: A single, generously sized island can host multiple functions seamlessly. Imagine a long stretch for prep, a dedicated section for a large farm sink, and a substantial overhang for a dining-style seating area that accommodates several people comfortably. The sheer scale allows for distinct zones without feeling crowded.
* Integrated Full-Size Appliances: Beyond microwaves and beverage coolers, a large island can house a full-size second oven, a dedicated warming drawer, a wine refrigerator, or even a compact dishwasher specifically for glassware near an entertainment zone. This level of integration truly elevates the island to a professional-grade workstation.
Seating for a Crowd: The Social Heartbeat
A large island is an invitation to gather. Design your seating to be both comfortable and conducive to conversation.
* Dining Table Height Extension: Instead of just a breakfast bar, consider lowering a section of your island to standard dining table height (around 30 inches). This allows for comfortable chair seating and creates a more formal dining experience right within your kitchen, perfect for family dinners or intimate gatherings.
* Wrap-Around Seating: Design your island with an overhang on two or even three sides. This encourages face-to-face interaction and makes the island a truly communal space, perfect for large families or frequent entertainers. Ensure ample knee room (at least 15 inches) for everyone.
* Bench Seating Integration: For a cozy and inviting feel, integrate a built-in bench along one side of your island. This can be upholstered for comfort and can even include hidden storage underneath, combining seating with practicality.
Luxury Touches and Statement Materials
With a larger canvas, you can truly indulge in luxurious materials and bespoke features.
* Waterfall Countertops: For a striking, modern aesthetic, extend your countertop material down the sides of the island to the floor. This creates a seamless, sculptural look that is incredibly impactful, especially with materials like marble, quartz, or granite.
* Statement Lighting: Above a grand island, you can afford to go bold with your lighting. Think a series of oversized pendant lights, a dramatic linear chandelier, or even a custom lighting fixture that becomes a true work of art, drawing the eye and defining the space.
* Custom Cabinetry and Finishes: Explore unique custom cabinetry for your island – perhaps a different wood species, a hand-painted finish, or intricate detailing that sets it apart from your main kitchen cabinets. This allows the island to truly be a feature piece.
Southern Hospitality Tip: When designing a large island for entertaining, think about flow. Can guests easily grab a drink without entering your main prep zone? Is there ample space for platters and charcuterie boards without feeling cluttered? A well-planned large island anticipates these needs.
Beyond the Basics: Innovative Island Features & Functions

The kitchen island has evolved far beyond a simple countertop. Today’s islands are smart, sophisticated, and packed with features that cater to our modern lifestyles. Let’s delve into some truly innovative ideas that can transform your island into a functional marvel and a joy to use.
Smart Storage Solutions That Spark Joy
Every inch of your island can be optimized for storage, often in surprising and delightful ways.
* Hidden Charging Stations: Integrate power outlets and USB ports discreetly into the side of your island or within a drawer. This keeps phones, tablets, and small appliances charged and out of sight, maintaining a clean aesthetic. Some even offer pop-up outlets or hidden wireless charging pads.
* Appliance Garages: A dedicated cabinet within your island can house small appliances like toasters, blenders, or coffee makers, keeping them off your main countertops. Some even have a built-in outlet inside, so you can use the appliance without moving it.
* Specialized Drawers: Think beyond standard cutlery. Design drawers specifically for baking sheets and cutting boards (vertical dividers are a godsend!), deep drawers for pots and pans, or even pull-out bins for pet food storage that blend seamlessly into the cabinetry.
* Spice Racks and Cookbook Nooks: Slim pull-out spice racks on the end of an island keep your most-used seasonings at your fingertips. A small open cubby can be the perfect spot to display your favorite cookbooks, adding personality and easy access to inspiration.
Integrated Technology and Entertainment
Your island can be a hub of connectivity and entertainment.
* Built-in Tablet/Smart Screen: Flush-mount a tablet or smart screen into your island for easy access to recipes, video tutorials, music, or even smart home controls. Imagine pulling up a cooking video right where you’re prepping!
* Pop-Up Outlets with USB: For ultimate convenience and a sleek look, consider pop-up electrical outlets that recede into the countertop when not in use. These are particularly useful for appliances that are used intermittently or for charging devices.
* Sound Systems: Discreetly integrate speakers into your island cabinetry or kick plate for ambient music while cooking or entertaining. Some islands even come with built-in Bluetooth speakers.
Unique Materials and Textures
Beyond the standard, explore materials that add character, durability, and a touch of the unexpected.
* Reclaimed Wood: For a farmhouse, rustic, or industrial aesthetic, a countertop or island base made from reclaimed wood tells a story and adds incredible warmth and texture.
* Concrete: A concrete island top offers a wonderfully modern, industrial, and incredibly durable surface. It can be poured in place or prefabricated, and can be stained or polished to achieve various looks.
* Zinc or Copper: For a truly distinctive and living finish, consider a zinc or copper countertop. These metals develop a beautiful patina over time, adding unique character and a touch of old-world charm.
* Integrated Cutting Boards: Build a permanent cutting board directly into a section of your countertop. It’s always there when you need it and blends seamlessly with the surface.
Sustainability Note: When choosing materials, consider their lifecycle. Reclaimed wood, recycled glass countertops, or locally sourced stone are wonderful choices for an eco-conscious home.
Crafting Your Island’s Aesthetic: Style & Material Magic
Your kitchen island isn’t just a workhorse; it’s a prominent design feature that can dictate the entire feel of your kitchen. The choices you make for its materials, finishes, and accessories are crucial in creating a space that feels cohesive, beautiful, and uniquely “you.” This is where the magic of design truly comes alive!
The Countertop Crown: Choosing Your Surface
The island countertop is often the first thing people notice, so choose wisely. Consider both aesthetics and practicality.
* Quartz: A perennial favorite for its durability, non-porosity (no sealing required!), and wide array of colors and patterns, including those that mimic natural stone. It’s incredibly low maintenance and perfect for busy households.
* Natural Stone (Marble, Granite, Quartzite):
* Marble: Offers unparalleled classic beauty and luxurious veining, but it’s softer and more porous, requiring sealing and careful maintenance to prevent etching and staining. It develops a beautiful patina over time, which many embrace.
* Granite: Extremely durable, heat-resistant, and comes in a vast range of colors and patterns. It’s a fantastic choice for a hardworking island and needs periodic sealing.
* Quartzite: Often mistaken for marble, quartzite is much harder and more durable, offering the elegant look of marble with granite-like resilience. A wonderful compromise!
* Solid Wood (Butcher Block): Adds incredible warmth, texture, and a rustic or farmhouse charm. It’s forgiving on knives but requires regular oiling and can show wear over time – which many find adds to its character.
* Stainless Steel: For a truly modern, industrial, or professional kitchen, stainless steel is hygienic, durable, and heat-resistant. It’s prone to scratches and fingerprints but can be a striking choice.
* Concrete: As mentioned, it’s durable and offers a sleek, modern, almost sculptural look. It can be customized with various finishes and colors.
The Base and Beyond: Cabinetry & Finishes
The island’s base is your opportunity to add character and define its style.
* Contrasting Colors: A popular and effective design trick is to paint or stain your island cabinetry a different color from your perimeter cabinets. A deep navy, an elegant forest green, or a soft gray island against white kitchen cabinets creates a beautiful focal point.
* Different Materials: Instead of painted wood, consider a natural wood island base in a kitchen with painted cabinets, or vice versa. This adds textural interest and depth.
* Open Shelving or Glass Fronts: Integrate open shelving on one side or end for displaying beautiful dishes, cookbooks, or decorative objects. Glass-front cabinets offer a similar display opportunity while keeping dust out.
* Paneling and Details: Shiplap, beadboard, or custom paneling on the non-working sides of your island can add architectural interest and a custom feel. Don’t forget the details like decorative corbels or legs if your style leans traditional.
Hardware and Lighting: The Jewelry of the Island
These small details have a huge impact on the overall look and feel.
* Cabinet Hardware: Choose pulls and knobs that complement your island’s style. Brass adds warmth and a touch of elegance, matte black is modern and chic, while brushed nickel is timeless. Don’t be afraid to mix metals subtly if done thoughtfully.
* Pendant Lighting: The lights above your island are a prime opportunity to make a statement.
* Symmetry and Scale: For most islands, two or three pendants create a balanced look. Ensure they are scaled appropriately – not too small to get lost, not too large to overwhelm.
* Style Match: Choose pendants that align with your overall kitchen aesthetic – industrial, farmhouse, modern, classic.
* Height: A good rule of thumb is to hang pendants about 30-36 inches above the countertop, ensuring they don’t obstruct views but provide ample task lighting.
* Under-Cabinet Lighting: If your island has an overhang for seating, consider adding LED strip lighting underneath the counter. This creates a beautiful ambient glow and highlights the island’s features, especially in the evening.
Styling Secret: Don’t forget to style your island! A beautiful fruit bowl, a fresh bouquet of flowers, a stack of your favorite cookbooks, or a charming ceramic pitcher can make your island feel lived-in and inviting. It’s the little touches that truly make a house a home.
The Practicalities: Planning, Placement, and Professional Pointers
Designing a kitchen island is an exciting journey, but it also requires careful planning and consideration of practical elements. Getting these right ensures your island is not only beautiful but also highly functional and safe. Let’s walk through the essential considerations before you commit to your dream island.
The Golden Rules of Clearance and Workflow
Placement is paramount for a functional kitchen. The island should enhance movement, not hinder it.
* Traffic Flow: Ensure there’s adequate space around all sides of your island for comfortable movement.
* Minimum Clearance: Aim for at least 36 inches (90 cm) between the island and any opposing countertop, wall, or appliance. This allows one person to move comfortably.
* Ideal Clearance: For a busy kitchen or one with multiple cooks, 42-48 inches (105-120 cm) is ideal, allowing two people to pass easily or for appliance doors (like a dishwasher or oven) to open fully without obstruction.
* The Kitchen Triangle: If your island is housing your sink or cooktop, consider its relationship to the refrigerator and other primary workstations. The “work triangle” (refrigerator, sink, range) should be efficient and unobstructed to minimize steps during food prep and cooking.
* Appliance Doors: Carefully consider how appliance doors will open. A refrigerator door, oven door, or dishwasher door should not crash into your island or block a main pathway when open.
Electrical, Plumbing, and Ventilation: The Hidden Essentials
These elements often require professional installation and are crucial for safety and functionality.
* Electrical Outlets: This is non-negotiable. Building codes typically require at least one outlet on an island. If you plan to use small appliances or charge devices, consider multiple outlets, perhaps pop-up versions or integrated into the sides. This must be planned early in the design phase.
* Plumbing for Sinks: If you envision a prep sink or a main sink on your island, plumbing lines will need to be run to it. This can be more complex and costly in an existing kitchen, so factor this into your budget and timeline.
* Ventilation for Cooktops: If your island hosts a cooktop or range, proper ventilation is absolutely critical.
* Downdraft Ventilation: This system pulls smoke and odors downwards and is built into the cooktop or countertop. It’s sleek but can be less powerful than overhead options.
* Overhead Range Hood: A ceiling-mounted or suspended range hood above an island cooktop makes a strong design statement and offers powerful ventilation. Ensure it’s correctly sized and positioned.
* Professional Installation: Always engage licensed electricians and plumbers for these installations to ensure safety and compliance with local building codes.
Budgeting and Working with Professionals
Designing an island can range from a simple DIY mobile cart to a complex custom build.
* Set a Realistic Budget: Consider the cost of materials (countertop, cabinetry), appliances, plumbing, electrical work, and installation. Custom islands will naturally be more expensive than prefabricated options.
* Prioritize Features: If your budget is tight, decide which features are non-negotiable (e.g., seating, a prep sink) and which can be added later or foregone.
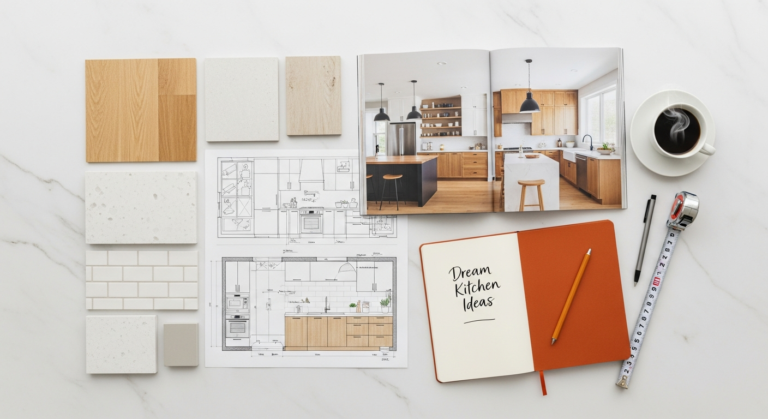
* Consult a Designer: For complex projects or if you’re unsure about layout and materials, a kitchen designer can be an invaluable resource. They can help you optimize your space, navigate material choices, ensure code compliance, and visualize your dream island. Their expertise can often save you money and headaches in the long run.
* Measure, Measure, Measure: Before ordering anything, measure your space meticulously. Double-check all dimensions, door swings, and pathway clearances.
Encouraging Word: While the practicalities can seem daunting, remember that meticulous planning upfront leads to a beautiful and functional island that you’ll adore for years to come. Don’t rush this stage; it’s an investment in the heart of your home!
Embrace Your Island Adventure!
My dear friends, the kitchen island truly holds the power to transform not just a room, but the very rhythm of your home. It’s a place where life unfolds, where the aroma of freshly baked goods mingles with lively conversation, and where everyday moments become cherished memories. Whether you’re dreaming of a compact, hardworking cart or a grand, multi-functional hub, remember that the perfect island is one that reflects your unique style, caters to your family’s needs, and brings joy to your daily routine. So, take these ideas, let your imagination sparkle, and embark on your own island adventure. The heart of your home awaits its magnificent centerpiece!
“`json
{
“@context”: “https://schema.org”,
“@graph”: [
{
“@type”: “Article”,
“mainEntityOfPage”: {
“@type”: “WebPage”,
“@id”: “https://www.rocksaltplum.com/kitchen-island-ideas-small-large-kitchens”
},
“headline”: “The Heart of the Home: Designing Your Dream Kitchen Island for Every Space”,
“image”: “https://www.rocksaltplum.com/images/kitchen-island-hero.jpg”,
“author”: {
“@type”: “Person”,
“name”: “Rock Salt Plum Editorial”
},
“publisher”: {
“@type”: “Organization”,
“name”: “Rock Salt Plum”,
“logo”: {
“@type”: “ImageObject”,
“url”: “https://www.rocksaltplum.com/images/rsp-logo.png”
}
},
“datePublished”: “2026-01-15T09:00:00+08:00”,
“dateModified”: “2026-01-15T09:00:00+08:00”,
“keywords”: “kitchen island ideas, small kitchen island, large kitchen island, kitchen design, kitchen remodel, island features, island materials, kitchen island planning, home interior design, wellness, entertaining”,
“articleSection”: [
“Home & Interior Design”
],
“articleBody”: “Oh, darling friends, if there’s one element that truly defines the modern kitchen as the heart of the home, it has to be the glorious kitchen island. More than just a simple countertop, it’s a dynamic stage where culinary magic happens, where laughter echoes during family meals, where homework is tackled, and where cherished memories are made over a shared cup of coffee. It’s the ultimate multi-tasker, a true workhorse wrapped in beautiful design. Whether your kitchen is a cozy nook or a sprawling culinary palace, the right island can elevate its functionality, beauty, and overall flow. Join me today as we explore a world of kitchen island ideas, proving that no matter the size of your space, your dream island is not just possible, but waiting to be discovered.\n\nDon’t let a compact kitchen deter your island dreams! Small spaces often inspire the most ingenious and charming solutions. The key here is multifunctionality, mobility, and smart scale. Think of your micro-island not as a chunky fixture, but as a graceful, hardworking companion that adapts to your needs.\n\nFor truly tiny kitchens, a mobile island on wheels is an absolute game-changer. These delightful pieces offer invaluable prep space when you need it and can be tucked away or moved to a different spot when you don’t.\n\nA classic for a reason! A sturdy butcher block top provides an excellent surface for chopping and food prep, while lower shelves or drawers can house extra pots, pans, or frequently used appliances like a stand mixer. Look for options with locking casters for stability. They add a wonderful, rustic warmth that feels so inviting.\n\nFor a more industrial or professional look, a slim stainless steel table offers incredible durability and hygiene. Many come with adjustable shelves, perfect for storing large bowls or serving platters. Their sleek profile often makes a small space feel less cluttered.\n\nThese can be incredibly versatile, offering multiple surfaces for different tasks. Imagine one tier for prep, another for holding ingredients, and a third for displaying a lovely vase of flowers or a stack of cookbooks.\n\nIf you have just a sliver more space, a permanently fixed, narrow island can provide significant utility without overwhelming the room.\n\nSometimes, the best \”island\” isn’t a standalone piece but a peninsula extending from a wall or existing cabinetry. This offers the benefits of an island (extra counter space, potential seating) while maintaining one open side for traffic flow. It’s a wonderful way to define zones within an open-concept layout without fully closing off the kitchen.\n\nIntegrate a slim island that doubles as a breakfast bar. A countertop that extends slightly beyond the base cabinetry on one side allows for stools to be tucked underneath, providing a casual dining spot without needing a separate table. Opt for backless stools or those that can be neatly slid away to save visual and physical space.\n\nEven the smallest fixed island can be a storage powerhouse. Think about pull-out spice racks, slim pantry cabinets, or open shelving for displaying your prettiest dishes. Vertical storage is your best friend in a small kitchen, so maximize every inch from floor to ceiling.\n\nAlways measure your clearances! You’ll want at least 36 inches (ideally 42 inches) between your island and surrounding countertops or walls to ensure comfortable movement and appliance access. In a truly tiny kitchen, even 30 inches might be workable if it’s not a primary thoroughfare, but aim for more if possible.\n\nFor those with a bit more breathing room than a micro-kitchen, but not quite the expanse of a grand estate, the medium-sized kitchen offers a sweet spot for a truly functional and beautiful island. Here, you can move beyond just the basics and start integrating more permanent features that enhance both form and function.\n\nThe key to a successful island in a medium-sized kitchen is finding the \”just right\” balance. It should feel substantial enough to be a focal point, but not so large that it impedes flow or makes the room feel cramped.\n\nWork with your kitchen’s natural flow. A standard island depth is usually 24-36 inches, but you might stretch to 42 inches if space allows. Length can vary widely, but aim for something that mirrors the scale of your surrounding cabinetry. Sketching out the footprint on your floor with painter’s tape can be incredibly helpful for visualizing.\n\nThis is where a medium island truly shines. Consider built-in appliances that enhance convenience without cluttering your main countertops.\n\nTucked neatly into the island cabinetry, a microwave drawer is ergonomic, keeps the


